Showing posts with label Crochet Jewelry. Show all posts

Tuesday, January 31

How to Crochet Spiky Puff Stitches

I used a different color per row for the how-to crochet stitch video below!
The Spiky Puff Stitch is what puts the 'palmetto' in the Palmetto Wristcuff! Don't the stitches look sort of like palm fronds? Also, the way the spike stitches point upward in the new pink one, looks like aloe vera plants to me. (The Palmetto Wristcuff pattern is one of many crochet jewelry patterns at my site and in Ravelry.)

I created a crochet stitch how-to video and uploaded it to Youtube today. I'm still practicing at making videos and it's not too bad! For my next trick I'm going to attempt to embed the video right here in this blog post.

If it doesn't work, here's the link to the video.

Wednesday, May 11

How to Make A Bead-Stringing Needle (& Why)

 Story of the Aquamarine Réclamé Lariat, blogged.
Some of the prettiest beads have tiny bead holes! What is a bead crocheter to do? A do-it-yourself beading needle worked the best when I wanted to use aquamarine beads for a Trailing Vine Lariat.

Gem chip beads usually have highly irregular bead holes in size and shape. I wanted to string them onto a strong size #20 crochet thread, and none of my needles were fine enough. My best chance was to make a bead-stringing needle out of the thinnest piece of wire I had on hand, which was 30 gauge. 
My DIY Needle Got These Strung

I wish I'd had even finer wire for this, such as 32ga or 34ga! (Notice that as wire gets finer in diameter, the gauge number gets larger.) This wire needle and my thread size were still a bit too thick for a few of my beads. If I tried to force them, they weakened the thread and needle. I decided it's not worth forcing them, and I learned to set aside those beads. 

A bead reamer might help make some of these beads more cooperative--if one exists for bead holes this small.

How to Save the Day in Two Seconds with a Bead-Stringing Needle 

From bottom to top: Step 1, Step 2, Step 3.
1. Cut a piece of the thinnest wire you can find. Cut it any length you like; approximately 3" (8 cm) long is a comfortable length for me. Sometimes I trim the beading end of it later if it gets bent or kinked.

2. Fold the piece in half; the fold becomes the eye of a beading needle. Leave the eye big if you like, as shown. It will collapse down to a tiny needle eye the first time you use it (as shown).
Pearls and abalone beads have tiny
irregular holes too. Satin Pillow Necklace

3. Insert the bead thread into the eye, then twist the two wire ends together as lightly as necessary to form a needle point. Add too many unnecessary twists will thicken the needle. That would defeat the purpose of making your own skinny needle! 

I have two other common sense suggestions that I learned the hard way LOL.

Label the Spool. Control the Spool.
Control how the wire unspools: I simply tie something through the spool center and around it. (Pictured at right is a "twisty-tie".) Then, when I cut off a piece of wire, I hook the new cut end around it. (You can kind of see this in the photo.) This tie controls the unspooling just enough for a manageable speed.

Be kind to yourself and label the spool with permanent ink, if it isn't already labeled! It's almost impossible to remember the gauge of a wire. A surprising number of spools are labeled only on discardable packaging, not the spool itself. 

Wednesday, September 1

Plying and Spinning Cotton Crochet Thread

2018 Update: For issue #91 of my crochet newsletter I distilled a lot of my thinking, experiences, and other information about the twist of yarn. Twist—the amount of it and the direction of it—is one of the things that makes crochet thread feel and behave so differently from yarn. Even from lace weight yarn.

An image from Issue 91: Crocheting a Yarn's Twist Energy


-:--------------:-

[from 2010] I'm collecting here the notes I've written on this over the years and will eventually polish it up into a real post. For now, it serves as a place to help crocheters choose the best yarns or threads for my crochet patterns. It's also a way to appreciate the key differences between what we call "yarn" vs "thread."

Cotton crochet thread of the same thickness as a yarn is often fundamentally different in its behavior when crocheted. One big reason (among others) for this is its direction of twist. Most crochet thread is "z-twisted" while most yarns are "s-twisted." (There aren't many exceptions!)

I find that this factor makes the biggest difference for most crochet jewelry I design, and when I'm using very tall stitches because of all the yarn overs. Yarn overs either add to a yarn's twist, or subtract from it (i.e. unwind it).

I try to use triple trebles with z-twisted yarns because an s-twisted yarn, if it's not tightly plied, will come untwisted from all the yarn-overs and is unpleasant to work with and look at. Splitty yarn can really slow down working off so many loops with each stitch, and I want the stitches to end up looking good enough to be worth the effort, instead of stringy or unbalanced. (I think this matters more for right handed crocheters than left handed because of the kind of working twist we add/subtract, not sure.)

Tuesday, August 10

Cotton Crochet Thread Sizes & Equivalents

Here's how I explain the thread weights in my crochet jewelry patterns, in order of thick thread to thin, with US, UK and AUS terms:
Irish Pearl Cords L to R: Size #5 Lanaknits Hemp,
Size #10 Cebelia, and Size #20 Opera threads.

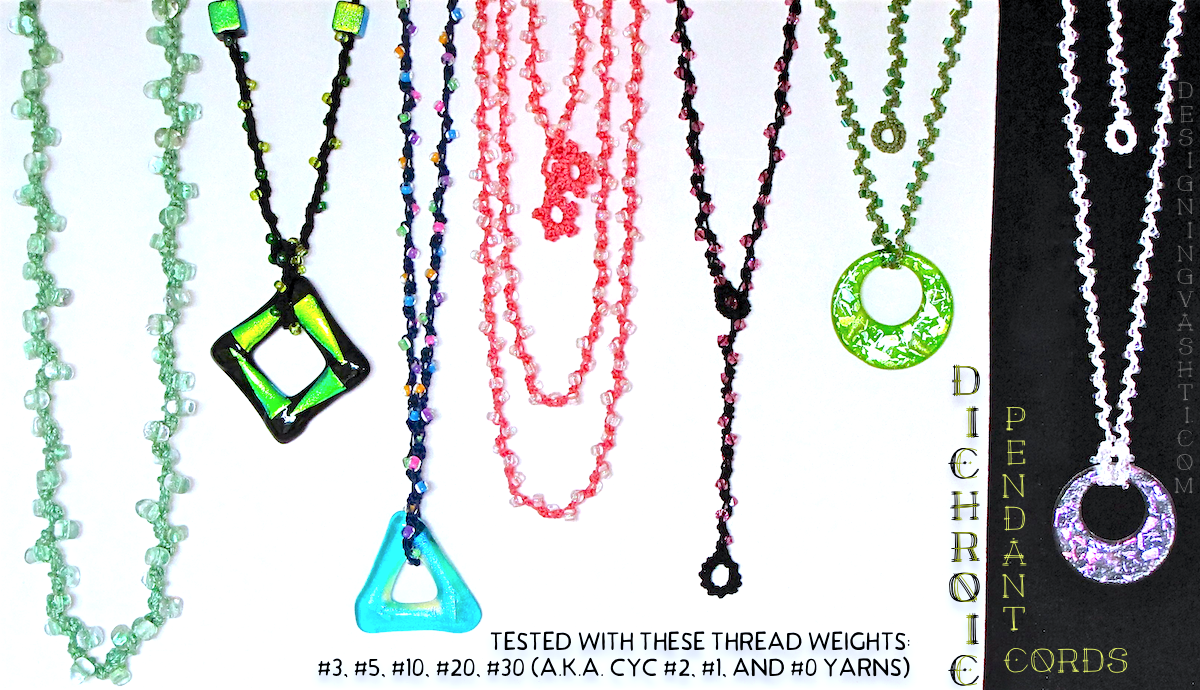
Size #3 crochet thread is fairly equivalent in thickness to CYCA #2 Fine or US "sport weight" yarns {UK Light DK, AUS 5 Ply}; however, yarns don't necessarily behave like a cotton crochet thread of the same thickness. Jewelry patterns often require crochet thread because of its smooth, finely twisted and plied mercerized cotton, usually “z-twisted.”

Size #5 crochet thread is fairly equivalent in thickness to CYCA #1 Super Fine or US "fingering weight' yarn {UK & AUS 3 Ply or 4 Ply}; however, not all yarns behave like a cotton crochet thread of the same thickness, so substitutions may not work well. Six-strand cotton embroidery floss falls in this size range when crocheted with all 6 strands together.

Size #10 crochet thread: some thread crocheters call this popular size “bedspread weight.”  It's lumped together with thinner thread sizes in the yarn industry’s catch-all “lace weight” category: CYCA #0 Lace weight yarn {UK & AUS ??}; and most lace weight yarns don’t behave like a cotton crochet thread of the same thickness. Most of my thread crochet jewelry is designed for use with smooth, finely twisted and plied mercerized cotton, preferably “z-twisted” (i.e. has a counterclockwise twist).

Dichroic Pendant Cords (pattern is adjusted for different thread weights)
Size #20 crochet thread: As with Size #10 & #30 crochet threads, equivalent yarn weight names are not helpful with these extra fine threads. For the best looking and lasting crochet jewelry, use a “6-cord” thread, sometimes called "cordonnet." It has recently become easier to find in more colors than the traditional white and ecru.

Size #30 crochet thread: As with Size #10 & #20 threads, equivalent yarn weight names are not helpful with these extra fine threads. For the best looking and lasting crochet jewelry, use a “6-cord” thread, although it's difficult to find it in modern colors.

Palmetto Cuffs crocheted of yarns spanning the light sport to
aran (heavy worsted) weight categories.
The yarn of the smallest cuff is equivalent to the thickest thread size #3!

Wednesday, June 16

Choosing Cotton Thread for Crochet Jewelry

Four Mermaid Chains, four brands of crochet thread!
Top right and bottom left corner is #10 Opera thread.
See a lovely variegated #20 Lizbeth one.

I have a handsome stash of a fine quality cotton crochet thread called Opera, ranging in sizes from #5 (approaching "fingering" weight") to #30.

The larger the number, the thinner the thread. Size #30 might look like sewing thread to some folks compared to size #10, but sewing thread is closer to a size #100 or #120.

I use Opera crochet thread mostly for crocheting jewelry. The jewelry I've made with it stays looking great longer because of its high quality cotton fiber, the higher twist, and smooth finish.

Opera is made by Coats, though regrettably I must now say WAS made by Coats. (It's discontinued.) What to do?

I've been having great luck with a crochet thread called Lizbeth. While maybe nothing can replace Opera thread for me completely, the Lizbeth color choices are great fun! Best of all Lizbeth is a six-cord thread (see below).
From the Slider Charms Trio 
pattern set.

What I Look For in a Crochet Thread

I used Lizbeth Size #10 for the green & brown
Sweet Almonds Set
Especially for jewelry.
  1. The higher the amount of twist, the better. (Known as a hard twist.) It will stay looking new longer and will hold its shape well.
  2. The number of plies matters--the more, the better. Threadies will refer to a thread as a "3-cord" or a "6-cord". Perle cotton is a "2-cord" thread. I've seen 6-cord threads referred to as "cordonnet" and heirloom-quality. Generally speaking, 6-cord is great for jewelry--at least, the kind that I like to design. Opera is an extra nice 3-cord thread, so that's why I say generally speaking.
  3. The quality of the cotton used. One can't always tell by look and feel because the fibers can have finishes added that give it a smoother, denser, shinier look on the ball. After some use, a lower-quality thread will get fuzzy or hairy, indicating that cheaper, shorter fiber lengths were used.
  4. Pretty colors! (Some of the best threads have traditionally been available in only white, off-white, and black.)
The best crochet threads for jewelry seem to be imported. Although your local yarn shop likely has a good selection of imported yarns, very few yarn shops carry heirloom-quality crochet thread.

Where to find great thread for jewelry? A few years ago I wrote "mainly on the internet if you live in the USA", but today it's easy to find Lizbeth thread in craft stores too. 

Learn how & why I developed this stitch pattern
to do planned color pooling with Lizbeth thread.
Occasionally I see DMC Cordonnet (an excellent thread) in a craft chain store, but only in white in a size #50 or crazier thinner (for tatting). I wonder if it's easy to tint with dyes....

Friday, April 2

Standard Necklace Lengths

I keep a list of standard necklace lengths handy when I write crochet jewelry patterns.
Satin Pillows Necklace is opera length.
(Coincidentally, I crocheted some of them with Opera thread.)


Trailing Vines is lariat length
Collar: 12" – 13"
(30.48 cm – 33 cm)
Choker: 14" – 16"
(36.5 cm – 41.5 cm)
Princess: 17" – 19"
(43 cm – 48 cm)
Matinee: 20" – 24"
(51 cm – 61 cm)
Opera: 25" – 34"
(64.5 cm – 87.5 cm)
Rope: 35" – 44"
(89 cm – 112 cm)
Lariat: 45" – 48"
(114 cm – 122 cm)


Tuesday, February 23

Crochet Cords for Pendants: Happy Pairings

Take a striking pendant, crochet a pretty cord, easy instant style, right? Well, it's almost that easy. Here is some advice to help ensure that you will be happy with your new crochet necklace.
The yellow pendant (far right) had such a small hole that
I had to crochet it right into the Cat's Eye pendant cord.
(See Problem #3 below)

Solving Common Problems

I design a lot of pendant necklaces and lariats and sometimes have compatibility issues between pendants and crochet necklace cords. (Happens with non-crochet necklaces too.)

Crochet jewelry materials, such as pendants, beads, string-like yarns, and crochet threads, vary widely in their availability around the country (US). This means that even though I can specify the exact thread and bead brands that work great for a crochet jewelry pattern, you may have no choice but to substitute.

Problem #1 

Oops, the pendant is too heavy.
It pulls on the crochet stitch work so that it looks inelegant, or the exquisite details are lost. This happens to me often, partly because I seem unable to resist chunky art glass pendants. They are the heaviest pendants I own. (The other reason it happens is that I tend to crochet a new necklace cord first, assuming I'll find a pendant that'll work when I'm done!) 

Solution
In both cases, it means crocheting the first four or more inches (10 cm) of the cord pattern you're using, then stringing on the pendant to test if you have a good match. (When designing, it means I just need to plan ahead better. Easy to say, but it means altering my natural way of designing. I now display my pendants pinned to a big flat board so that they are as visible as my yarns and threads.)

Problem #2 

The pendant isn't heavy enough!
Part of what makes a jewelry piece successful is its drape, and show of weightiness. Stiffer yarns, tapes, and strings like hemp, metallic braids, and wire are some of the very best for crocheting jewelry. Light weight pendants abound (such as when they are made of wood or thin beaten metal). They may not have enough weight to pair well with stiffer crochet cords. Even a soft thread may need a heavier pendant if the crochet stitch used is thick.

Solutions:
  • Test first, like above.
  • Supplement the weight of the pendant by adding seed beads to the crochet. String them onto your yarn before crocheting. Note: This brings its own issues. Almost no pendant holes are big enough for seed-beaded crochet to pass through (but see below). Also, believe it or not, sometimes even beading will not add enough weight!
  • If you're committed to crocheting with a particular stiff material, this is when you can feel free to use the heavier pendants. Otherwise, switch to one that works better with the pendant.  
  • A few pendants are just too lightweight for the pattern, no matter what material you use; I try to notify you within the pattern if I think some lighter pendants just can’t work. 

Mermaid Chains are rather ingeniously
(if I may say) designed for easily switching pendants
that have smaller holes!

Problem #3

The Pendant hole is too small :-(
This is always a bummer for me. I've never seen a pendant opening that's too big but many are too small, yet I can't resist buying them anyway. 

Solutions:
  • String the pendant onto the yarn/thread before crocheting. Test: crochet the pattern for a few inches/cm, then crochet the pendant right into the next stitch as if it's a bead. Continue the pattern for a few more inches. If you like how it hangs, begin fresh with pre-strung pendant. At the halfway point of your necklace, crochet the pendant into the next stitch.
  • Add a larger link to the pendant so that it can be strung freely onto the finished cord, using standard metal jewelry findings and tools. Better yet:
  • Crochet your own "link"! Just a thin crocheted ring through the pendant opening will do. See image below.

From Crochet Inspirations Newsletter issue 81,
"Crocheting Pendant Loops"
See how the direction of the hole has also changed?

Problem #4

The Pendant turns to the side when it hangs; the hole goes the wrong way.
The pendant opening tunnels either from side to side, or from front to back. Sometimes it doesn't seem to matter much for the pattern, so you need to test. 

Solutions: Try the solutions for Problem #3. Crocheting the pendant into a stitch may change the direction of the pendant opening, depending on the stitch. Adding a crocheted or metal link to the pendant first will change the direction of the pendant opening.

If you have any related issues or solutions I haven't mentioned here, please add them in the Comments below.