Monday, June 27

Crocheting a Triangular Shawl Point-to-Point

The Ennis Shawl pattern was first published in
Interweave Crochet Magazine
I've published two crochet patterns so far of triangular shawls and scarves that are crocheted from one point to the other, and I have at least five more on the way. [Update: I'm up to eleven as of 2018]


I'm a big fan of this way to crochet a "baktus"-style (wide, shallow triangular scarf) and other triangular wraps. I'm writing this blog post for the crocheters who have never made a shawl this way and who may find it puzzling at first.

Islander: Its long narrow
corners can be easily tied
The two published designs so far are Islander (Tunisian crochet) and Frostyflakes (regular crochet). When I get questions about these patterns, it's because the look of their set-up rows confuses crocheters, even if they're making them correctly. 


Crocheting point to point is a new experience. It seems to be a less common type of construction. All you have to do is expect your set-up rows to look unfamiliar, and before you know it, the choppy seas will turn calm and it will be smooth sailing. So smooth, in fact, that you'll pick up a lot of speed and keep thinking "just one more row!"

1-skein Frostyflakes
Look closely at these next two photos. See the long straight side across the top? (In the red one it is the neck edge.) Now look at each end of this long straight side. These two corners of the triangle are the "points." You start at one point and finish at the other point. 

Imagine what the first few rows of these scarves might have looked like when I began them. You can see why some crocheters could think they're doing something wrong.

The set-up rows for a point-to-point wrap can look odd for two reasons:

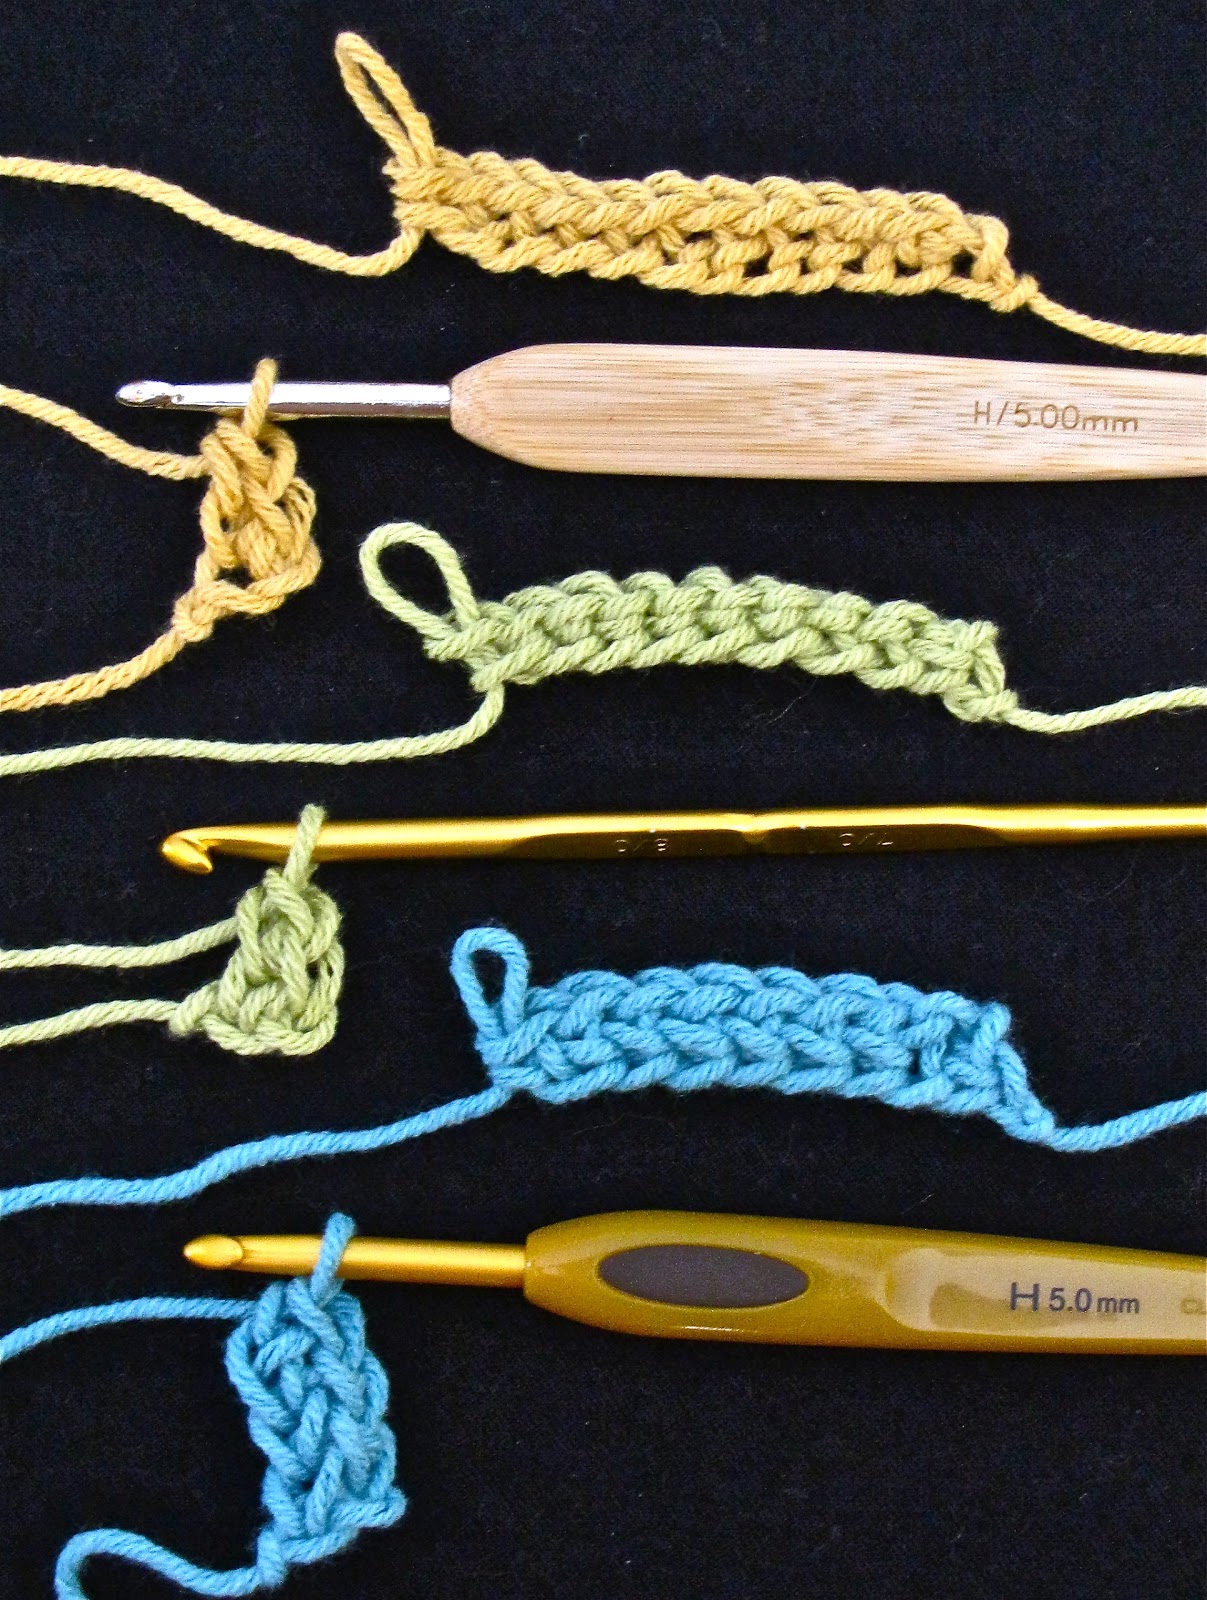
Swatch worked "point to point" 
(upper corner to upper corner)
1. It's a new experience even for a crocheter who has tried traditional "corner-start" projects. Most of these (often called "Diagonal Stitch") increase on both ends of the rows to create a center point of a symmetrical triangle shape. (After awhile, one decreases instead of increases, and ends up with a square dishcloth or rectangular afghan.)  

Frostyflakes: See the straight
 edge, worked even?
Point-to-point is a little different because you only increase along one side of the triangle. This can cause the first 5 rows or so to look odd, if you're used to traditional "corner-start" or "corner to corner".

2. It's a new experience even for a crocheter who has made triangular wraps that start along the longest top edge, or grow outward from the center of the top edge, or start at the bottom center point. This is because another way to think of "Point-to-Point" construction is "Side-to-Side." When you wear your finished point-to-point shawl, the rows will run vertically from its top (at your neck) to its bottom edge (near your waist or elbow). 

If one were to make a rectangular wrap from side to side, one might say it's worked "from one short edge to the other." A "side to side cardigan" means that the foundation row runs vertically along the button band, or along a side seam. 

The only difference between point-to-point and side-to-side is that with point-to-point you start with almost no foundation row, whereas with side-to-side you start with a longer, more familiar and recognizable foundation row. This is another reason that the first 5 rows or so can look odd, if you're not used to it.

The self-striping yarn helps to make
the side-to-side rows obvious
Crocheting point to point is actually easy because you're only ever increasing or decreasing along one edge of your shawl. The opposite edge is worked even. 

It's easiest of all with Tunisian crochet because you don't turn your work. I prefer to do increases or decreases along the right edge of my Tunisian rows (the start of the Forward Passes) because Tunisian crochet is naturally suited to this. 

Crocheting point to point is fun because you can close your eyes and pick any yarn from your stash. You don't have to worry about running out of yarn, or finding a yarn with the right thickness. 

Then, set up your starting corner: these set up rows are also the shortest rows, so they work up quickly. Reward yourself with chocolate if it's your first time, and then you'll be on your way to crocheting at your peak speed. Once your starting corner is set up, it's usually easy to remember the stitch pattern; you can avoid reading the instructions for each row until you're ready to begin the decrease rows.

This is Islander's center bottom corner. Just switch
from making increase rows to making decrease rows.
When I design a new point-to-point shawl, I'm in complete control of how much yarn I'll need as I go--especially if I edge it as I go too. I simply start decreasing when I've use half of the yarn I wish to, or when the center row is the length I like for the deepest center point of the triangle.


Islander is wide enough to wear as a vest, 
withlong points tied at the back waist.
Crocheting point to point is versatile. If you wish to try designing your own, it's a great way to create a wide, shallow triangle, which often has a more modern or updated look, and is more flattering on some folks. A bonus of such an oblique angle is that the two points are elongated and skinny and can easily be used as ties (such as for a sarong or head scarf). I found about seven different ways to wear the Islander Wrap because of this feature!
Frostyflakes in DesigningVashti Lotus yarn

Thursday, June 23

Knots in Yarn: Options

Often, a skein of yarn comes from the mill packing a surprise: knots with the ends trimmed too close. The occasional mill-tied knot is a necessary evil of the yarn spinning process, and can really cause problems while crocheting or knitting, especially if the yarn is slippery or the stitches are lacy or loose.

Good News! I've published Ennis, with a chart too.

I encountered this most recently with the silkiest bamboo yarn I've ever used, called SWTC Bamboo. [UPDATE: I've since published the pattern in both this yarn and DesigningVashti Lotus yarn—which by the way has zero-to-1 knots per ball.] 

The silky ends I wove in have stayed put so far.


Yarn Knot Best Practices

My first choice for a project like this would be to rip out the existing row to the start of it, cut the yarn, and reattach it without the mill-tied knot in it. that way the new knot is at the edge. 


A possible alternative to ripping out the partial row is to cut the knot out of the yarn, then re-knot it a bit loosely, leaving yarn ends about 5 inches long each. 


I've had good luck separating the plies of the yarn and weaving in each ply separately using a sharp needle so that one ply is threaded through the center core of nearby strands. I'd thread a different ply through different nearby strands, so that a thickened area is not created. 
About the yarns shown: Far left is DesigningVashti Lotus (colors Satin Grey and Lavender Ice). The aqua blue one is Interweave Crochet Magazine's choice for their version of this pattern. The orange was from my own yarn stash; both are SWTC Bamboo.

This works fine for Lotus. For SWTC Bamboo, though, it's a fine-knit tube, not twisted plies to be separated. What's working instead is to use a sharper yarn needle to pierce through to the center of a strand and hide a yarn end in it.


If the yarn can be felted here's another option. Yarn that is at least 50% wool, cashmere, or alpaca,  and is not superwash, will likely felt. This makes felt-joining possible. (I don't have much experience with this.) It could leave a thickened area like the Russian join does sometimes. If it's felted together really well, it could be trimmed thinner, but might be a bit stiffer than the rest of the stitches. Depends on the particular project.


So far, weaving in the separated plies of the yarn ends with a sharp needle has worked well for me, especially with silkier yarns that would otherwise work themselves loose over time. 
A special thank you to Anne!

Friday, May 13

Which Foundation Stitch? and Why?

I researched 43 crochet stitch dictionaries and basic crochet how-to books to find out more about crochet foundation stitches (alternatives to starting a crochet project with a foundation chain). For a 2014 update, scroll to the end of this post.


Top to Bottom: Double Chain (dch); "Foundation Slip Stitch" (fslst); Foundation Single Crochet (fsc)
You can read a summary of this research in my Crochet Inspirations Newsletter issue #18, "Deep Crochet Research" (available online for free here. Scroll down to the bottom to sign up for a free subscription.)


Above is a visual comparison of the three slimmest, simplest chainless foundations that I know of. They are all stretchier and easier to work into than foundation chains. (I've omitted fancier decorative ones such as picot foundations.


What follows is a photo tutorial for making each of them: the classic dch, the dark horse fslst, and the popular fsc. By doing it this way I hope to make it very clear how these three overlap yet differ in a few key ways. It's easy to confuse them as being the same thing. This actually keeps us from recognizing that we have more choices in how we start a new crochet project than we thought!


(Below, the step-by-step photos may look a bit jumbled on some people's screens. To view them enlarged in high resolution, and in their original order with full descriptions, you might prefer to see them in this photo set.)


From my research I found that the top/yellow stitch is traditionally called "Double Chain" (occasionally, Double Foundation Chain, Double Chain Stitch, etc). It is consistently abbreviated "dch". By traditionally I mean that I found this stitch with this name and abbreviation in over half of the 43 books, dating from the 1800's to 2010. (In the rest of the books I found no alternative to a foundation chain at all.)


The bottom/blue stitch is much newer than the dch and seems to be gaining widespread acceptance, especially on the internet. I found it in a smattering of books from 2005 to the present; it also appeared online in 1998, thanks to Mary Rhodes. This stitch is by now almost always called "Foundation Single Crochet" and abbreviated "fsc." The ultimate source on it is Marty Miller's article, "Get in the Loop: Foundation Stitches" in the Spring 2007 issue of Interweave Crochet magazine.


The green stitch in the center is my personal favorite of these three choices. I'm not the first to use it, but this exact stitch does not appear in any of the books I have. It simply combines what I think is the best of the dch and the fsc.


The Work at Home Vest
I wrestled with what to name it. "Foundation slip stitch" (fslst) has its pros & cons as do all other names I considered, such as "alt fsc" and "extended slst." I'm going with fslst because in a "family" of foundation stitches like the fsc (and taller versions such as fdc, ftr, and so on), it's a logical name for a slimmer option. Sometimes the fsc is a bit too beefy to substitute for a plain foundation chain. 

As you can see in the top photo, the fslst is the slimmest of the three. It is without a doubt the one perfect foundation for my Work@Home Vest neckline. 
Step 1


Here are the instructions to go with each step-by-step photo.


Step 1: 
To begin the dch, the fslst, and the fsc, chain 2.


Step 2: 
For dch (left/yellow): insert hook in ONE top loop of 2nd ch from hook.
Step 2
For fslst (center/green): insert hook in TWO loops of 2nd ch from hook.
For fsc (far right/blue): insert hook in TWO loops of 2nd ch from hook.


Step 3: 
Yarn over hook and pull up a loop: 2 loops on hook.
Step 3


Step 4:
For dch: Yarn over and pull through both loops on hook: first dch stitch made.
For fslst: Yarn over and pull through both loops on hook: first fslst stitch made.
Step 4
For fsc: Yarn over and pull through ONE loop on hook: 2 loops remain on hook. This chain stitch forms the base, or foundation, of a single crochet (sc) that will be created next. For crocheters new to the fsc, it helps to pinch this chain just made. Now yarn over and pull through both loops on hook: sc made.


Step 5:
Step 5
To make the next dch: insert hook under the ONE strand along the left side (if you're crocheting right handed) of dch just made, yarn over and pull up a loop.


To make the next fslst: insert hook under the TWO strands along the left side (if you're crocheting right handed) of fslst just made, yarn over and pull up a loop.


To make the next fsc: insert hook under TWO strands of the base chain (that you are hopefully pinching with your fingers) of fsc just made, yarn over and pull up a loop.
Step 6


Step 6: 
To complete the dch: Yarn over and pull through BOTH loops on hook. Avoid "yanking" it tight. Repeat Steps 5 and 6 for desired number of foundation stitches.


To complete the fslst: Yarn over and pull through BOTH loops on hook. Avoid "yanking" it tight. Repeat Steps 5 and 6 for desired number of foundation stitches.


To complete the fsc: Yarn over and pull through ONE loop on hook. Avoid "yanking" it tight. (Pinch this stitch to mark it for yourself that it's where you'll start the next fsc.) Yarn over and pull through both loops on hook to complete the fscRepeat Steps 5 and 6 for desired number of foundation stitches.

Update! 


Wednesday, May 11

How to Make A Bead-Stringing Needle (& Why)

 Story of the Aquamarine Réclamé Lariat, blogged.
Some of the prettiest beads have tiny bead holes! What is a bead crocheter to do? A do-it-yourself beading needle worked the best when I wanted to use aquamarine beads for a Trailing Vine Lariat.

Gem chip beads usually have highly irregular bead holes in size and shape. I wanted to string them onto a strong size #20 crochet thread, and none of my needles were fine enough. My best chance was to make a bead-stringing needle out of the thinnest piece of wire I had on hand, which was 30 gauge. 
My DIY Needle Got These Strung

I wish I'd had even finer wire for this, such as 32ga or 34ga! (Notice that as wire gets finer in diameter, the gauge number gets larger.) This wire needle and my thread size were still a bit too thick for a few of my beads. If I tried to force them, they weakened the thread and needle. I decided it's not worth forcing them, and I learned to set aside those beads. 

A bead reamer might help make some of these beads more cooperative--if one exists for bead holes this small.

How to Save the Day in Two Seconds with a Bead-Stringing Needle 

From bottom to top: Step 1, Step 2, Step 3.
1. Cut a piece of the thinnest wire you can find. Cut it any length you like; approximately 3" (8 cm) long is a comfortable length for me. Sometimes I trim the beading end of it later if it gets bent or kinked.

2. Fold the piece in half; the fold becomes the eye of a beading needle. Leave the eye big if you like, as shown. It will collapse down to a tiny needle eye the first time you use it (as shown).
Pearls and abalone beads have tiny
irregular holes too. Satin Pillow Necklace

3. Insert the bead thread into the eye, then twist the two wire ends together as lightly as necessary to form a needle point. Add too many unnecessary twists will thicken the needle. That would defeat the purpose of making your own skinny needle! 

I have two other common sense suggestions that I learned the hard way LOL.

Label the Spool. Control the Spool.
Control how the wire unspools: I simply tie something through the spool center and around it. (Pictured at right is a "twisty-tie".) Then, when I cut off a piece of wire, I hook the new cut end around it. (You can kind of see this in the photo.) This tie controls the unspooling just enough for a manageable speed.

Be kind to yourself and label the spool with permanent ink, if it isn't already labeled! It's almost impossible to remember the gauge of a wire. A surprising number of spools are labeled only on discardable packaging, not the spool itself. 

Friday, April 8

Five Basic Rules in Tunisian Crochet Patterns

2018 Update: I revised this popular post and created a permanent page for it at my new website.

Eilanner is a fancier variation of the Islander Wrap.
Both are exceptions to Rule #2 below!
Test yourself time! Below is my list of the top five rules in Tunisian crochet.

Why? Because:
Standards in Tunisian crochet pattern writing are less developed than non-Tunisian crochet standards. I hadn't noticed this until I began publishing my own Tunisian crochet patterns. For non-Tunisian crochet, I head over to the industry's official yarnstandards.com and usually find everything I need, from yarn weight descriptions to skill levels and crochet stitch symbols. I feel confident that other professional crochet designers are using the same site as they write their patterns too. This helps all crocheters.

Five Peaks Wrap  ©Interweave Press
When writing a Tunisian crochet pattern, however, there is no widely known and accepted standard list of Tunisian stitch symbols, or skill levels. Sure, a Tunisian pattern that requires no shaping should be rated easier than one requiring shaping; but it's pretty fuzzy which Tunisian stitches worked into which stitch loops are more intermediate or advanced than other stitches. Ask ten Tunisian crocheters and you could get ten different answers.

Example, pictured at right: When the Five Peaks Wrap was published in the Spring 2010 issue of Interweave Crochet magazine, it was rated Easy. It is 90% Tunisian Simple Stitch (the beginner's stitch), and in most of the rows, you do the same thing over and over. However, it is such a different experience of Tunisian crochet that in retrospect I think it should have been rated Intermediate. 

I'm also finding out as I teach classes locally that the best way to arrange the sections of a Tunisian crochet pattern, and how certain things are explained, differ from what works for non-Tunisian crochet patterns.

Unless the only thing going on is Tunisian simple stitch, crocheters struggle more if the list of Tunisian pattern abbreviations is on a separate page. (It requires one to flip back and forth between pattern and abbreviations list.) They are also prone to forgetting at least one of the five rules, below.

The Top Five Rules to Know for Every Tunisian Crochet Pattern
How many of these do you always remember, even if they're not explicitly stated in an Intermediate-level Tunisian crochet pattern? 
  
Intriguing exception to Rule #2.
1. Each Row consists of a Forward Pass (when loops are put onto the hook) and a Return Pass (when the loops are worked off of the hook).

2. The fronts of your stitches face you at all times; you do not turn your work at the end of a Forward Pass or Return Pass. (Unless specifically instructed to.)

3. The single loop on the hook at the beginning of every Forward Pass counts as the first stitch of the new row. You do not chain to begin a new row. You also do not work into the very first stitch along that beginning edge of the row (Unless specifically instructed to, such as when you wish to increase stitches.)

Burly Bias: fun, easy exception to Rule #3.
4. The last stitch at the other edge of the Forward Pass is worked into two edge loops, not just one, for a nicer finished edge. Also, work this last stitch more loosely to match the beginning edge stitch, which naturally and unavoidably loosens as you complete the row. I blogged more about this here.
  
5. A Tunisian stitch is composed of a front vertical bar, a back vertical bar, and 3 horizontal bars located at the top of the 2 vertical bars.
Imagine what this means: you can work into not only 1 of 5 different loops of a stitch, but any combination of these 5....or into the space between two stitches....
  
Do you have one to add to this list?