Thursday, December 16

Tunisian Crochet Basics: How to End a Forward Pass

I use this abbreviation in my Tunisian crochet patterns: endTss. It stands for "ending Tunisian simple stitch." If you are crocheting right-handed, this would be the stitch found along the left edge (and this is reversed if you're left handed).

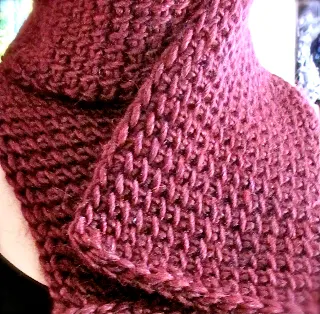
"Burly" Men's Scarf in Tunisian Simple Stitch
In pattern-writing language endTss is one of several ways to say, "Work the last stitch of each forward pass the usual standard recommended way."

This left edge stitch has a front vertical bar, like the other Tunisian stitches of each row. It also has a few other vertical strands associated with that same stitch. In fact, it has a total of three vertical strands. Why? Because the last Tss of the row is always a chain stitch, and a chain stitch has three strands in it. (Watch how the last stitch is created next time you crochet it and then begin the Return Pass.)

Some crocheters insert the hook under just the one front vertical bar, same as for the rest of the stitches of the row; however, "endTss" means do not do that. Instead, insert the hook under the front vertical bar and one other nearest vertical strand of the stitch. The outermost one is the easiest.

Doing this, instead of picking up only one strand, will give the edge a more finished chained look. This two-strand chained effect is preferable because:
  1. It matches the other 3 edges better (especially if you began your project by working into the bottom third loop of the foundation chains).
  2. It has a bit more heft, so it helps stabilize and even out the edge more than a lone strand would (it is "self-finishing").
  3. If you will be crocheting a border along the edge, it's a better and more pleasant edge to work stitches into.
I'm not aware of it preventing curling though :-)

See the two-strand chained edge of this Burly Scarf?

Sunday, November 21

Dimensional Fabric Paint for Crochet Projects

School Teacher's "Gallon Friend"
'Melted Chocolate' Coffee Cozy
Dimensional fabric paint, also referred to as 3-D fabric paint, comes in a full rainbow of shiny, glittery, iridescent, and matte colors.

I've found that fabric paint is very useful for certain crochet projects.


With fabric paint you can:
  • Use on slipper soles for traction
  • Reinforce edges (fabric paint is waterproof and more durable than yarn)
  • Replace cross stitching and other surface embellishment
  • Add permanent facial features that won't pose a choking hazard to very young children
  • Add calligraphy-like text and symbols
  • Valentine (Ravelry Project page)
  • Glue yarn ends to secure from view, using a paint that matches the yarn color.
Pokemon Toy blogged here
Sometimes it's simply the best option for embellishing, adding facial details, even text! I love the fine touches embroidery can contribute to crocheted fabric, but some crochet projects need to stand up to hard wear and tear; for example, kitchen items and children's toys.

Crochet stitches themselves are durable, even self-reinforcing! Dimensional fabric paint, which is a machine washable and dryable acrylic polymer, is the only material I've used with crochet that not only holds up as well as crochet, but can even outlast the life of it.

My best advice to you, if you've never tried combining crochet and fabric paint, is to practice, practice, practice on swatches. You have one chance to get it right when applying this paint to crochet!

Wednesday, September 1

Plying and Spinning Cotton Crochet Thread

2018 Update: For issue #91 of my crochet newsletter I distilled a lot of my thinking, experiences, and other information about the twist of yarn. Twist—the amount of it and the direction of it—is one of the things that makes crochet thread feel and behave so differently from yarn. Even from lace weight yarn.

An image from Issue 91: Crocheting a Yarn's Twist Energy


-:--------------:-

[from 2010] I'm collecting here the notes I've written on this over the years and will eventually polish it up into a real post. For now, it serves as a place to help crocheters choose the best yarns or threads for my crochet patterns. It's also a way to appreciate the key differences between what we call "yarn" vs "thread."

Cotton crochet thread of the same thickness as a yarn is often fundamentally different in its behavior when crocheted. One big reason (among others) for this is its direction of twist. Most crochet thread is "z-twisted" while most yarns are "s-twisted." (There aren't many exceptions!)

I find that this factor makes the biggest difference for most crochet jewelry I design, and when I'm using very tall stitches because of all the yarn overs. Yarn overs either add to a yarn's twist, or subtract from it (i.e. unwind it).

I try to use triple trebles with z-twisted yarns because an s-twisted yarn, if it's not tightly plied, will come untwisted from all the yarn-overs and is unpleasant to work with and look at. Splitty yarn can really slow down working off so many loops with each stitch, and I want the stitches to end up looking good enough to be worth the effort, instead of stringy or unbalanced. (I think this matters more for right handed crocheters than left handed because of the kind of working twist we add/subtract, not sure.)

Tuesday, August 10

Cotton Crochet Thread Sizes & Equivalents

Here's how I explain the thread weights in my crochet jewelry patterns, in order of thick thread to thin, with US, UK and AUS terms:
Irish Pearl Cords L to R: Size #5 Lanaknits Hemp,
Size #10 Cebelia, and Size #20 Opera threads.

Size #3 crochet thread is fairly equivalent in thickness to CYCA #2 Fine or US "sport weight" yarns {UK Light DK, AUS 5 Ply}; however, yarns don't necessarily behave like a cotton crochet thread of the same thickness. Jewelry patterns often require crochet thread because of its smooth, finely twisted and plied mercerized cotton, usually “z-twisted.”

Size #5 crochet thread is fairly equivalent in thickness to CYCA #1 Super Fine or US "fingering weight' yarn {UK & AUS 3 Ply or 4 Ply}; however, not all yarns behave like a cotton crochet thread of the same thickness, so substitutions may not work well. Six-strand cotton embroidery floss falls in this size range when crocheted with all 6 strands together.

Size #10 crochet thread: some thread crocheters call this popular size “bedspread weight.”  It's lumped together with thinner thread sizes in the yarn industry’s catch-all “lace weight” category: CYCA #0 Lace weight yarn {UK & AUS ??}; and most lace weight yarns don’t behave like a cotton crochet thread of the same thickness. Most of my thread crochet jewelry is designed for use with smooth, finely twisted and plied mercerized cotton, preferably “z-twisted” (i.e. has a counterclockwise twist).

Dichroic Pendant Cords (pattern is adjusted for different thread weights)
Size #20 crochet thread: As with Size #10 & #30 crochet threads, equivalent yarn weight names are not helpful with these extra fine threads. For the best looking and lasting crochet jewelry, use a “6-cord” thread, sometimes called "cordonnet." It has recently become easier to find in more colors than the traditional white and ecru.

Size #30 crochet thread: As with Size #10 & #20 threads, equivalent yarn weight names are not helpful with these extra fine threads. For the best looking and lasting crochet jewelry, use a “6-cord” thread, although it's difficult to find it in modern colors.

Palmetto Cuffs crocheted of yarns spanning the light sport to
aran (heavy worsted) weight categories.
The yarn of the smallest cuff is equivalent to the thickest thread size #3!

Saturday, July 17

Crochet Picots You Can Love

Cute picots border every edge
of the Liebling Shrug.
A picot is a decorative little bump of crochet stitches that adds just the right touch to many kinds of crochet projects, often as a finished edge. It's smaller than a bobble, puff, or cluster; ideally it's a cozy little knot that's "cute as a button."

Check out the cute bowtie picots along this shoulder seam!

I've heard many crocheters say that they don't like the look of their picots. After crocheting for 30 years or so, I can say that no matter how many picots one has under one's belt, the next one may look mediocre for a number of reasons that are easy to fix

Rosepuff Shawlette's bead-picot edge
The first thing I do is try my favorite way to make them, below. It comes the closest to producing a fail-safe picot, with the added bonus of being the fastest and smoothest stitching motion for me (keeps the picots from feeling like "speed bumps" LOL). 

Vashti's Favorite Way to Crochet Picots

I used this method for the Liebling Shrug and the flounced Antoinette, Emdash, and Cantina scarves. In fact, I talked about this picot method in this blog post about the picot lace sleeves of the Baroque Tabard.
Insert the hook from the top down into two front loops of the "host" stitch (the last stitch made before chaining 3 or 4 to start the picot). This "host" stitch can be any stitch except a slip stitch; a vertical "bar" or "leg" of the stitch is needed to comfortably and swiftly work into. 
The 1,380 Cashmere Picots Scarf.
(The edge is a mix of picots & petals.)
It's so easy to do it, but the words can make it sound difficult. 

Depending on the look (which sometimes has to do with the yarn, or my hook size), I might close with a single crochet (sc) worked into these two loops, OR a slip stitch (sl st). Either way, I love how it stabilizes a picot with a stronger base, and it's is easier to make quickly. Closing with a sc instead of sl st can add more bulk if the picots seem puny. 

When I've chosen *against* this method, such as for the 1,380 Cashmere Picots Scarf, it can be because the picot comes out looking blockish sometimes. Also sort of flat or less of a pearly 3-D knot. Each case is different.
Picot foundation for the
1,380 Cashmere Picots Scarf.

I always try out a range of ways to make picots no matter what the pattern or stitch dictionary says.

For example:

  • Chain 4 instead of 3 (most people chain 3)
  • Heck, try chaining 2 and then close with a sc (usually makes a little molehill)
  • Chain tightly. Or, loosely.
  • Close it with a sc if you tried a sl st.
  • If you work into the first chain of the picot chains, try working into different loops of that chain.
  • I used a subtle type of picot for Lotus Chip Charms.
  • Invent-A-Picot: I wonder what happens if you chain 1 then do a 2-hdc puff in the top of the stitch just before the chain-1?
I hope each crocheter explores alternate ways to make picots so that each of us always gets the kind that we want!

Wednesday, June 16

Choosing Cotton Thread for Crochet Jewelry

Four Mermaid Chains, four brands of crochet thread!
Top right and bottom left corner is #10 Opera thread.
See a lovely variegated #20 Lizbeth one.

I have a handsome stash of a fine quality cotton crochet thread called Opera, ranging in sizes from #5 (approaching "fingering" weight") to #30.

The larger the number, the thinner the thread. Size #30 might look like sewing thread to some folks compared to size #10, but sewing thread is closer to a size #100 or #120.

I use Opera crochet thread mostly for crocheting jewelry. The jewelry I've made with it stays looking great longer because of its high quality cotton fiber, the higher twist, and smooth finish.

Opera is made by Coats, though regrettably I must now say WAS made by Coats. (It's discontinued.) What to do?

I've been having great luck with a crochet thread called Lizbeth. While maybe nothing can replace Opera thread for me completely, the Lizbeth color choices are great fun! Best of all Lizbeth is a six-cord thread (see below).
From the Slider Charms Trio 
pattern set.

What I Look For in a Crochet Thread

I used Lizbeth Size #10 for the green & brown
Sweet Almonds Set
Especially for jewelry.
  1. The higher the amount of twist, the better. (Known as a hard twist.) It will stay looking new longer and will hold its shape well.
  2. The number of plies matters--the more, the better. Threadies will refer to a thread as a "3-cord" or a "6-cord". Perle cotton is a "2-cord" thread. I've seen 6-cord threads referred to as "cordonnet" and heirloom-quality. Generally speaking, 6-cord is great for jewelry--at least, the kind that I like to design. Opera is an extra nice 3-cord thread, so that's why I say generally speaking.
  3. The quality of the cotton used. One can't always tell by look and feel because the fibers can have finishes added that give it a smoother, denser, shinier look on the ball. After some use, a lower-quality thread will get fuzzy or hairy, indicating that cheaper, shorter fiber lengths were used.
  4. Pretty colors! (Some of the best threads have traditionally been available in only white, off-white, and black.)
The best crochet threads for jewelry seem to be imported. Although your local yarn shop likely has a good selection of imported yarns, very few yarn shops carry heirloom-quality crochet thread.

Where to find great thread for jewelry? A few years ago I wrote "mainly on the internet if you live in the USA", but today it's easy to find Lizbeth thread in craft stores too. 

Learn how & why I developed this stitch pattern
to do planned color pooling with Lizbeth thread.
Occasionally I see DMC Cordonnet (an excellent thread) in a craft chain store, but only in white in a size #50 or crazier thinner (for tatting). I wonder if it's easy to tint with dyes....

Friday, April 2

Standard Necklace Lengths

I keep a list of standard necklace lengths handy when I write crochet jewelry patterns.
Satin Pillows Necklace is opera length.
(Coincidentally, I crocheted some of them with Opera thread.)


Trailing Vines is lariat length
Collar: 12" – 13"
(30.48 cm – 33 cm)
Choker: 14" – 16"
(36.5 cm – 41.5 cm)
Princess: 17" – 19"
(43 cm – 48 cm)
Matinee: 20" – 24"
(51 cm – 61 cm)
Opera: 25" – 34"
(64.5 cm – 87.5 cm)
Rope: 35" – 44"
(89 cm – 112 cm)
Lariat: 45" – 48"
(114 cm – 122 cm)


Sunday, March 21

What's "Hook-Led Gauge"? Why is it Important?

Use extra-fine lace weight alpaca yarn and
a big Tunisian crochet hook. for the
Convertible Smokestack Vest
2018 Update: I revised this post and created a permanent page for it at my new website.

Learning how to let your crochet hook determine your stitch gauge is possibly the most valuable skill a crocheter could develop.


Why?

A hook-led gauge is necessary for making fashionable-looking crochet fabrics with dramatic drape and textures. Sometimes I think of it as "crocheting with air" -- that's how it might feel to use a very big crochet hook with a fine or very stretchy yarn.
    It comes in handy when making Love Knots and other intermediate-level stitches that depend on being able to "eyeball" a loop size.
      You'll be ahead of the curve if you'd like to someday crochet professionally as a teacher, designer or as a valuable pattern tester for other designers!

      Weightless Tunisian Wrap
      It breaks a habit that many crocheters develop: they make their chains and slip stitches tighter than their other stitches, regardless of their hook size. 
      The Eva Slip Stitch Shrug

      Sometimes the crocheter simply crochets much more tightly or loosely no matter what size hook they're using. Other crocheters are actually using the yarn as a gauge guide. Crocheters who are used to using a lot of cotton yarn or thread, which is not stretchy to work with, tend to do this.
      Every crocheter starts out with a natural gauge, often called the "crocheter's hand." With enough practice, crocheters can have more control over their natural stitch gauge. This is actually an intermediate skill that leads to advanced crocheting, although it's not listed in any of the standard skill level descriptions.

      To maintain the best stitch gauge throughout, use the diameter of your hook to judge if your stitches are the right size: as you crochet, the space between the two top loops of each stitch should look large enough to fit the size of the crochet hook you're using. 
      The stretchy slip stitch Pullover Shrug

      See issue #59 of Crochet Inspirations Newsletter about it: http://us2.campaign-archive2.com/home/?u=8d9b0b0df0b73f0fdcb7f4729&id=9c8df8dd87
      Starwirbel Cowl. See newsletter 
      issue #60 for more.
      You might feel a bit outside of your comfort zone at first. If so, just tell yourself that you're making an important investment in your hobby: a world of exciting new stitches and designs will open up to you.

      Tuesday, March 9

      My Favorite Way to Add A Professional Look FAST

      2018 Update: I revised this post and created a permanent page for it at my new website. Also see issue #26 of my Crochet Inspirations Newsletter, "Creative Stitch Blocking".

      I give it spritz so I can drape it on the mannequin and
      see if I should keep going! "Tripuff Tunic"
      in DesigningVashti Lotus yarn.
      I'm going to describe a "finishing technique" but I don't wait until the end of a project to do it. It is usually called "blocking"...but this is only one blocking method of many. 

      I'm talking about the power of mist. Not steam, not water, not a special soaking liquid, just low-tech plain cool water mist!

      It's an essential tool in our project bags along with scissors, and yarn needles for weaving in ends. 


      Ten ways I use plain mist first and sometimes exclusively with crochet:


      pre-blocked Tunisian Islander Wrap
       1) When I want to see how the project might look when finished but I don't want to wet it and have to wait more than 15 minutes for it to dry. I mist it enough on a flat surface so that as I pat it out evenly, I see and feel that the stitches are relaxing and socializing with each other nicely.

      2) For solid stitch patterns like Tunisian Simple Stitch, or single crochet, post stitch patterns, etc., I mist a bit after I work 12 inches or more of the project so that I can see the fabric look its most sleek, flat, and even. It's a boost for me to see my stitches look so good.

      Tunisian Islander Wrap 
      after simple blocking.
      3) When I start with the inside end of a new ball of yarn and it's too crinkled. I mist the stitches to see if the crimps are distorting my gauge. Or, I pull out enough of the yarn from the ball, wind it loosely over a chair or something, and mist it lightly so that it relaxes the wrinkles enough that I can crochet it comfortably in 15 minutes or so.

      4) To renew my confidence or excitement in a lace project. I want to see its real beauty as I go! It was great for the Weightless Tunisian Wrap.

      The Eilanner Shawl:
      diagonal crochet loves to be blocked.
      5) To learn more about an expensive yarn that may be delicate. Mist is very gentle. I choose expensive yarns for their beauty, so I mist a swatch of one to get a preview of the full finished beauty of the stitch pattern I'm using. I can also see if it sheds easily, if it goes limp and flat, if it gives off dye, has a strong smell, etc.

      6) To make minor adjustments in the fit of clothing.

      7) To avoid re-doing a seam or edging if possible. Mist might be all it needs to look smooth and make the stitches play nicely with each other.

      8) Mist may be enough to make picots, corners and angles look crisp and pressed. I mist, stretch, pat, press it with my fingers like it's dough until it's the way I want it, then let dry.

      9) When I swatch with a yarn that's new to me and it's unexpectedly stiff. It's amazing how a little mist will bring out a yarn's true personality! Especially linen, hemp, cotton yarns.

      Tunisian crochet lace, unblocked.
      10) When I mist a swatch with any yarn while designing, I can get a quick sense for whether I'm on the right track: how good a stitch pattern looks in the yarn, whether I think I should go up or down a hook size, and how much the stitches might stretch out or grow.
             I know that many crocheters (and knitters) don't block their work because they simply don't want to! It sounds optional, or boring and time-consuming. Others don't know how, and once we complete a project, we don't want to learn an additional finishing step. We want it to be finished already!
        Spritzed with water and spread out.

             I spent most of my life not blocking my crochet. If I liked how my stitches looked, I kept going until I was done. When I was done, it looked fine to me, and that's that. I wasn't crocheting clothes, nor doilies that needed to lie flat and even. When I went through a phase of crocheting every snowflake pattern I could find, it was a new world of wetting, starching, and pinning them evenly so that the lacy stitches looked gorgeous. I hated waiting for them to dry. I did not call this "blocking"–I'm not sure if I knew the word. I thought it was only for snowflakes and doilies. 

             A spray bottle is a crocheter's best friend. I even keep a tiny one in my project bag.

        Monday, March 1

        Crocheting Coffee Cozies the Goldilocks Way


        Alpine Coffee Cozy for chunky yarn.
        I want a coffee cozy that fits just right: one that improves my grip on a full cup of steaming hot java.

        If it doesn't fit the cup snugly, it slides around and interferes with a secure grip. 

        If a cozy is too cozy, however, it's tricky to slip onto a full cup without splashing oneself. This is why my crochet coffee cozy patterns tend to include exacting instructions for the foundation rows.

        I'm like Goldilocks when it comes to crocheted coffee cozies! Feel free to be less exacting while crocheting one, and later, if like Goldilocks you'd like your cozy to fit just so, try one of these tips:

        Not-Cozy-Enough Coffee Cozy?
        • Tighten up the bottom edge with a round of slip stitches. (Pictured: close up of slip stitch reinforcement)
        • Fit it over a cardboard sleeve that usually comes with the cup (just keep one handy and reuse it.)
        Overly-Cozy Coffee Cozy?
        • Wet it and stretch it. If that doesn't loosen it enough, you can do what my friend does: 
        • She drinks mostly large iced drinks and purposely makes the bottom rim of her cozies too small for the cup. This causes its bottom rim to curve under the cup. The cozy absorbs the condensation from the cup (especially if the cozy is cotton), which makes the cup dripless. In other words, the cozy becomes a portable coaster. 
        Click here and here for some snug-fitting examples that I freelanced for magazines. You might like my coffee cozy newsletter issue #54, "How and Why of Crochet Coffee Cozies" :)

        Saturday, February 27

        Two Kinds of Crochet Slip Knots

        2018 Update: I've revised and expanded this post at my new website. I recommend these posts!
        Start Crocheting From Scratch
        More Ways to Start Crocheting
        Starting Knot Variations
        How To Do a Slip Knot Variation

        -:-------------------------------:-

        I knew of only one kind of slip knot when I learned how to crochet at the age of nine. Many years passed before I learned that there are actually two versions of it from a crocheter's point of view. I call one adjustable (blue one in photo) and the other, locking or secure (the red one). The only difference is which yarn end you use to make it.

        It used to be that all of my slip knots were adjustable by accident, now they are all secure on purpose! Video links are at the end of this entry.

        Which Kind Do You Make?

        Tug on the short end of the yarn (a.k.a. the cut end or "tail").

        • If doing this tightens the loop, you made an adjustable slip knot
        • If you tug on the long or "ball end" (i.e. where the yarn that is attached to the skein) to tighten the loop, it is a locking slip knot.

        The locking version is important because there's no chance of it coming undone under stress, such as when it is part of a purse bottom, or the clasp end of heavy beaded jewelry, or the center of afghan motifs.

        The adjustable version is useful for closing up a center hole in one of the many methods of crocheting in the round: If you work all stitches of the first round into one chain, you can then pull on the yarn tail to close up the center hole tightly. Be sure to leave a long enough end (more than four inches/10 cm) for weaving in securely so that it won't loosen later.

        If your adjustable slip knots have never loosened, perhaps you have woven in a nice long yarn end to secure it; or used a non-slippery yarn, or a tight stitch gauge.

        Slip Knot Video

        This video demonstration (not mine) shows three ways to make a slip knot. The first two are just different ways to make an adjustable slip knot. Notice how she uses the short yarn end when completing the slip knot, and then tightens the loop around the hook by pulling the short end.

        The third slip knot in the same video is the locking slip knot. Notice she uses the ball end (long yarn end) when completing the slip knot.

        Friday, February 26

        Tips for Crocheting with Wire


        Solstice Bangles how-to, Winter 2017
        Even if you've been crocheting with wire for a long time, your stitches are likely to look loose and irregular. There’s also no way that your stitches can look neat, even, and flat while you’re gripping it to work the stitches. It doesn't matter! When you're done, you can "block" your stitches by poking and pulling individual strands into place with your hook. (It's one of five ways listed in this newer post for giving your crochet a nice finish.)

        More Tips for Crocheting with Wire

        1) If the wire feels too slippery, try looping it around an additional finger for more tension.

        2) For tighter stitches, use a finer (thinner) gauge of wire if possible; if not, try to make small contained movements as you crochet.

        3) 28 gauge ("28ga") wire is thinner and easier to crochet than 26ga. Crocheting wire uses new muscles that other kinds of crocheting don’t require. It’s more important than usual to avoid hunching your shoulders as you work. If you have trouble with the 28ga at first, start with the next finer size: 30ga. Any size you use will be beautiful.

        4) If you find that you use one of your fingertips as a backing when trying to poke the hook through a stitch, wear a thimble or band-aid on that finger for cushioned support.
        A bookmark in progress of pure silver wire,
        crocheted for my grandfather 

        5) Assume that you can’t rip out mistakes. Sometimes you can without breaking the wire, but you will still be weakening it. It’s best to leave tiny kinks in the wire; trying to remove them stresses the wire even more. 

        Wire is weird because it’s so strong that you have to manhandle it, but it can snap, so you have to baby it at the same time. 

        If the wire does break, don’t worry. Twist together the broken ends and keep going. With some wire projects you don’t really need to weave in a tail, just try to keep ends from popping up and feeling prickly or snagging things (this is especially important with jewelry items).
          If you love adding little seed beads to stitches, here's your chance. There's nothing easier than stringing them onto wire and crocheting them into stitches as you go!

          Tuesday, February 23

          Crochet Cords for Pendants: Happy Pairings

          Take a striking pendant, crochet a pretty cord, easy instant style, right? Well, it's almost that easy. Here is some advice to help ensure that you will be happy with your new crochet necklace.
          The yellow pendant (far right) had such a small hole that
          I had to crochet it right into the Cat's Eye pendant cord.
          (See Problem #3 below)

          Solving Common Problems

          I design a lot of pendant necklaces and lariats and sometimes have compatibility issues between pendants and crochet necklace cords. (Happens with non-crochet necklaces too.)

          Crochet jewelry materials, such as pendants, beads, string-like yarns, and crochet threads, vary widely in their availability around the country (US). This means that even though I can specify the exact thread and bead brands that work great for a crochet jewelry pattern, you may have no choice but to substitute.

          Problem #1 

          Oops, the pendant is too heavy.
          It pulls on the crochet stitch work so that it looks inelegant, or the exquisite details are lost. This happens to me often, partly because I seem unable to resist chunky art glass pendants. They are the heaviest pendants I own. (The other reason it happens is that I tend to crochet a new necklace cord first, assuming I'll find a pendant that'll work when I'm done!) 

          Solution
          In both cases, it means crocheting the first four or more inches (10 cm) of the cord pattern you're using, then stringing on the pendant to test if you have a good match. (When designing, it means I just need to plan ahead better. Easy to say, but it means altering my natural way of designing. I now display my pendants pinned to a big flat board so that they are as visible as my yarns and threads.)

          Problem #2 

          The pendant isn't heavy enough!
          Part of what makes a jewelry piece successful is its drape, and show of weightiness. Stiffer yarns, tapes, and strings like hemp, metallic braids, and wire are some of the very best for crocheting jewelry. Light weight pendants abound (such as when they are made of wood or thin beaten metal). They may not have enough weight to pair well with stiffer crochet cords. Even a soft thread may need a heavier pendant if the crochet stitch used is thick.

          Solutions:
          • Test first, like above.
          • Supplement the weight of the pendant by adding seed beads to the crochet. String them onto your yarn before crocheting. Note: This brings its own issues. Almost no pendant holes are big enough for seed-beaded crochet to pass through (but see below). Also, believe it or not, sometimes even beading will not add enough weight!
          • If you're committed to crocheting with a particular stiff material, this is when you can feel free to use the heavier pendants. Otherwise, switch to one that works better with the pendant.  
          • A few pendants are just too lightweight for the pattern, no matter what material you use; I try to notify you within the pattern if I think some lighter pendants just can’t work. 

          Mermaid Chains are rather ingeniously
          (if I may say) designed for easily switching pendants
          that have smaller holes!

          Problem #3

          The Pendant hole is too small :-(
          This is always a bummer for me. I've never seen a pendant opening that's too big but many are too small, yet I can't resist buying them anyway. 

          Solutions:
          • String the pendant onto the yarn/thread before crocheting. Test: crochet the pattern for a few inches/cm, then crochet the pendant right into the next stitch as if it's a bead. Continue the pattern for a few more inches. If you like how it hangs, begin fresh with pre-strung pendant. At the halfway point of your necklace, crochet the pendant into the next stitch.
          • Add a larger link to the pendant so that it can be strung freely onto the finished cord, using standard metal jewelry findings and tools. Better yet:
          • Crochet your own "link"! Just a thin crocheted ring through the pendant opening will do. See image below.

          From Crochet Inspirations Newsletter issue 81,
          "Crocheting Pendant Loops"
          See how the direction of the hole has also changed?

          Problem #4

          The Pendant turns to the side when it hangs; the hole goes the wrong way.
          The pendant opening tunnels either from side to side, or from front to back. Sometimes it doesn't seem to matter much for the pattern, so you need to test. 

          Solutions: Try the solutions for Problem #3. Crocheting the pendant into a stitch may change the direction of the pendant opening, depending on the stitch. Adding a crocheted or metal link to the pendant first will change the direction of the pendant opening.

          If you have any related issues or solutions I haven't mentioned here, please add them in the Comments below.

          Monday, February 22

          Tips for Working with Jelly Yarn(tm)

          Moonglow Pocket Pillow makes good use of the
          glow in the dark Jelly yarn!
          I first wrote these tips for a pattern called Barbed Wire BeltYou can put these tips to use right away if you already have some of this unique yarn at home. In the meantime, more crochet patterns for Jelly Yarn® are coming because I cannot resist its siren song. 

          Tip #1 

          If you can't make the initial slip knot tight enough to stay knotted, add a dab of superglue.

          Tip #2 

          Use a small amount of hand cream or something silicone-based on your crochet hook to really build up stitching speed! Also try switching to a Boye aluminum crochet hook or one with a brushed finish.

          Tip #3 

          Parakeet Perchswing (my birds' favorite toy!) is
          now free at my new website.
          The Jelly Yarn® is a "monofilament," not twisted plies. Like ribbon and tape yarns, it will acquire some twist as you work with it. I ignore it, unless it starts kinking up. Pulling more yarn from the ball helps because it postpones the twist down the line, indefinitely. Sometimes I crochet it standing up and shake the twist down the strand.

          Tip #4 

          Jelly Yarn® seems to stick more or resist me when I'm tired, stressed, or impatient. It's the same if I'm in a hot or stuffy room. Therefore I figure that either Jelly Yarn® has psychic powers, or when I'm stressed I become hot and stuffy too. If this happens to you, just take a break, turn up the A/C, and maybe even place your yarn in an ice chest and work that way! 

          "Flying Jelly Ring, Tambourine Version"
          from 
          Jelly Yarn: 20 Cool Projects for Girls to Knit and Crochet

          Tip #5 

          If you have kids, guard your jelly stash carefully. If you don’t have kids, other people’s kids will find you and stare soulfully until you make something for them.