Wednesday, May 11

How to Make A Bead-Stringing Needle (& Why)

 Story of the Aquamarine Réclamé Lariat, blogged.
Some of the prettiest beads have tiny bead holes! What is a bead crocheter to do? A do-it-yourself beading needle worked the best when I wanted to use aquamarine beads for a Trailing Vine Lariat.

Gem chip beads usually have highly irregular bead holes in size and shape. I wanted to string them onto a strong size #20 crochet thread, and none of my needles were fine enough. My best chance was to make a bead-stringing needle out of the thinnest piece of wire I had on hand, which was 30 gauge. 
My DIY Needle Got These Strung

I wish I'd had even finer wire for this, such as 32ga or 34ga! (Notice that as wire gets finer in diameter, the gauge number gets larger.) This wire needle and my thread size were still a bit too thick for a few of my beads. If I tried to force them, they weakened the thread and needle. I decided it's not worth forcing them, and I learned to set aside those beads. 

A bead reamer might help make some of these beads more cooperative--if one exists for bead holes this small.

How to Save the Day in Two Seconds with a Bead-Stringing Needle 

From bottom to top: Step 1, Step 2, Step 3.
1. Cut a piece of the thinnest wire you can find. Cut it any length you like; approximately 3" (8 cm) long is a comfortable length for me. Sometimes I trim the beading end of it later if it gets bent or kinked.

2. Fold the piece in half; the fold becomes the eye of a beading needle. Leave the eye big if you like, as shown. It will collapse down to a tiny needle eye the first time you use it (as shown).
Pearls and abalone beads have tiny
irregular holes too. Satin Pillow Necklace

3. Insert the bead thread into the eye, then twist the two wire ends together as lightly as necessary to form a needle point. Add too many unnecessary twists will thicken the needle. That would defeat the purpose of making your own skinny needle! 

I have two other common sense suggestions that I learned the hard way LOL.

Label the Spool. Control the Spool.
Control how the wire unspools: I simply tie something through the spool center and around it. (Pictured at right is a "twisty-tie".) Then, when I cut off a piece of wire, I hook the new cut end around it. (You can kind of see this in the photo.) This tie controls the unspooling just enough for a manageable speed.

Be kind to yourself and label the spool with permanent ink, if it isn't already labeled! It's almost impossible to remember the gauge of a wire. A surprising number of spools are labeled only on discardable packaging, not the spool itself. 

Friday, April 8

Five Basic Rules in Tunisian Crochet Patterns

2018 Update: I revised this popular post and created a permanent page for it at my new website.

Eilanner is a fancier variation of the Islander Wrap.
Both are exceptions to Rule #2 below!
Test yourself time! Below is my list of the top five rules in Tunisian crochet.

Why? Because:
Standards in Tunisian crochet pattern writing are less developed than non-Tunisian crochet standards. I hadn't noticed this until I began publishing my own Tunisian crochet patterns. For non-Tunisian crochet, I head over to the industry's official yarnstandards.com and usually find everything I need, from yarn weight descriptions to skill levels and crochet stitch symbols. I feel confident that other professional crochet designers are using the same site as they write their patterns too. This helps all crocheters.

Five Peaks Wrap  ©Interweave Press
When writing a Tunisian crochet pattern, however, there is no widely known and accepted standard list of Tunisian stitch symbols, or skill levels. Sure, a Tunisian pattern that requires no shaping should be rated easier than one requiring shaping; but it's pretty fuzzy which Tunisian stitches worked into which stitch loops are more intermediate or advanced than other stitches. Ask ten Tunisian crocheters and you could get ten different answers.

Example, pictured at right: When the Five Peaks Wrap was published in the Spring 2010 issue of Interweave Crochet magazine, it was rated Easy. It is 90% Tunisian Simple Stitch (the beginner's stitch), and in most of the rows, you do the same thing over and over. However, it is such a different experience of Tunisian crochet that in retrospect I think it should have been rated Intermediate. 

I'm also finding out as I teach classes locally that the best way to arrange the sections of a Tunisian crochet pattern, and how certain things are explained, differ from what works for non-Tunisian crochet patterns.

Unless the only thing going on is Tunisian simple stitch, crocheters struggle more if the list of Tunisian pattern abbreviations is on a separate page. (It requires one to flip back and forth between pattern and abbreviations list.) They are also prone to forgetting at least one of the five rules, below.

The Top Five Rules to Know for Every Tunisian Crochet Pattern
How many of these do you always remember, even if they're not explicitly stated in an Intermediate-level Tunisian crochet pattern? 
  
Intriguing exception to Rule #2.
1. Each Row consists of a Forward Pass (when loops are put onto the hook) and a Return Pass (when the loops are worked off of the hook).

2. The fronts of your stitches face you at all times; you do not turn your work at the end of a Forward Pass or Return Pass. (Unless specifically instructed to.)

3. The single loop on the hook at the beginning of every Forward Pass counts as the first stitch of the new row. You do not chain to begin a new row. You also do not work into the very first stitch along that beginning edge of the row (Unless specifically instructed to, such as when you wish to increase stitches.)

Burly Bias: fun, easy exception to Rule #3.
4. The last stitch at the other edge of the Forward Pass is worked into two edge loops, not just one, for a nicer finished edge. Also, work this last stitch more loosely to match the beginning edge stitch, which naturally and unavoidably loosens as you complete the row. I blogged more about this here.
  
5. A Tunisian stitch is composed of a front vertical bar, a back vertical bar, and 3 horizontal bars located at the top of the 2 vertical bars.
Imagine what this means: you can work into not only 1 of 5 different loops of a stitch, but any combination of these 5....or into the space between two stitches....
  
Do you have one to add to this list?

Wednesday, March 30

How to Take Control of Double Crochet Stitch Height & Row Gauge


A Taller Double Crochet has Advantages.

Lovelace Ring Scarf (before seaming). Taller edge stitches 
smooth out the sides of this scarf, and preserve the geometric 
look of the love knots.

Getting Row Gauge
Taller double crochets could be the solution to matching the row gauge required for a project (a common and pesky problem).

I first saw this advantage addressed by Pauline Turner in her Crocheted Lace book. Pauline explains why even experienced crocheters can have trouble getting a doily to lie flat: their stitch heights might vary from the designer's

Interestingly, she found that crocheters from different parts of the world have different standards for how tall they make one of the most common crochet stitches of all: the double crochet (UK & Australia: treble crochet).

Increase Fashionable Drape
Dee Stanziano was the first to bring this to my attention. She distinguishes three types of crocheters: Lifters, Riders, and Yankers. Doris Chan, who knows a thing or two about drape, has a great blog post about it: "Confessions of a Lifter." Taller double crochet stitches look less chunky, more limber, longer-legged, and elegant.

I used mostly V-stitch for the Work@Home Vest
Match the Height of a Turning Chain-3
The sides of your rows will smooth out and the whole fabric will drape better. It's important for the geometrical look of love knot mesh patterns when they begin and end with dc. Stitch patterns like the popular "V-Stitch" double crochet pattern look smoother and have more flex. 

This is especially valuable when crocheting clothing, especially if using bumpy or stiff yarns. I used mostly V-stitch for the Work@Home Vest. The Peaches 'n Creme cotton version (off-white vest) is a pleasant surprise: it drapes! It feels soft, flexible, and smooth-textured instead of having hard lumps where the dc's are worked into the spaces between the stitches. 


Stretch Your Dc
Did you know that when beginning a double crochet stitch ("dc" or in UK, "tr"), some crocheters pull their loop up higher than other crocheters do? 

This causes the final stitch height to vary. It means that the row gauge (number of rows per inch) can vary from one crocheter to another, even if they have the same stitch gauge (number of stitches per inch).


If you think of the base of a crochet stitch as having two "feet" anchored in or around a stitch, then pulling up higher while working the stitch creates longer "legs." Longer legs create enough room for stitches to flex and drape, even when anchored around multiple strands of yarn. This is something I'm going to keep in mind when I use other stitch patterns featuring stitches that are worked into the spaces between stitches.


Today I discovered a Crochetville conversation in which Jean Leinhauser describes her "Golden Loop" method for the dc (or UK tr) stitch: 

"YO, insert hook in specified stitch and draw up a loop -- NOW STOP! This is the Golden Loop, and it determines the ultimate height of your stitch. If you need a taller stitch, draw this loop up higher. If your stitch is too tall, don't draw this loop up so high.Now just finish the dc as usual. You may need to practice a few rows with the new height to get it to become automatic. It is this one loop, not the size of the hook, that determines row gauge."
I learned to crochet decades ago from my mother. In Dee's terminology, Mom and I were "Riders." For a long time I wondered why one is supposed to chain 3 to begin a row of dc, instead of 2. This is because my ch-3 was taller than my dc's.

Some simply chain 2 instead. As long as shorter rows of dc won't be a problem for your project, this is a fine fix. 

First Thread Cardigan project 
(needs to be blocked)

In my case, I hit a snag in 1999 when I began my first cardigan made of mainly dc....in THREAD....with BEADS. After much crocheting, I just could not match the row gauge even though I could get the stitch gauge. I was baffled and worried that there was something wrong with how I crochet.


If I didn't get the right row gauge, then the armholes would come out too small: yikes! 


The Extended Double Crochet
My fix for it was to change all dc into "extended dc" ("edc"). It's like adding a chain to the stitch's height. Kristine Mullen has a good photo tutorial of how to do this stitch. She also contrasts the height of it with a regular dc and with a regular treble crochet stitch. 

An advantage of using edc in place of dc for the cardigan is that the stitches have a bit more drape. They're slimmed down because a chain is slightly less meaty than the post of a dc. A disadvantage is that an extra step is added to each and every stitch. Combined with the beads I was adding, this was too much extra fuss to be fast and fun. (I still haven't completed it.) 


If I'd known back then about being a "Lifter" instead of a "Rider" I would have learned to make lifted dc instead. I'd rather change my "riding habit" than to add an extra chain to each dc for such a big thread project. 


Nowadays I'm more often a "Lifter" by pulling up a bit on the "Golden Loop," especially when crocheting clothing. My goal is for my dc stitches to be 3 chains tall, my trebles to be 4 chains tall, and so on.

Thursday, February 10

That Tricky Half Double Crochet Stitch (hdc)

The Half Double crochet stitch (HDC) is known as the Half Treble in the UK and Australia. 
Do you love this stitch too? These four designs make good use of it:
L to R: Orbit Cowl, Half Double Handbag, Bling Bam Bangle for beginners, and Pallas.
Come to think of it, so does the Buffalo Knot Belt!


2018 Update: New crocheters learn how to do the HDC stitch very early on, so it's really only a little bit tricky—in potentially two ways. The original blog post below is about identifying the true last stitch of an HDC row. Before you read it, check that you're doing the correct yarn over for it each time. You do a total of three yarn overs before you've completed each HDC. Some folks mix the yarn overs with "yarn unders".
Now, back to the show.
-:------------:-

The last HDC of a row can fool an unsuspecting crocheter.
When this happens, the stitch count of a row is accidentally increased or decreased, and uneven edges result.

Here are four photos of HDC stitches. In the first one, how many more HDC do I need to complete the row?
a) Two
b) Three
c) Four

If you said two, you've been tricked by the last HDC stitch into thinking that it is the turning chain-2 that began that row. You would accidentally decrease a stitch. If you answered four, you're perceiving the turning chain-2 as being another HDC, and you would accidentally increase a stitch. We don't crochet into the turning chains of HDC rows (though there are occasional exceptions to this rule, and it will be explicitly stated in patterns). If you answered three, you're correct.


In the second photo I've completed all but the last remaining HDC of the same row as in the first photo. To make it more obvious where the last stitch will go, I poked the crochet hook into the space. Can you see the hole that remains from where the hook entered it? (compared to no hole in the first photo.) Anything after that hole is the turning chain-2, and we just ignore it.

Before I explain photos 3 & 4, I have a suggestion that might help. After all, no one will be looking over your shoulder and poking a crochet hook into the last real HDC so that you can tell for sure which is the last stitch.

The guideline I use for identifying the last HDC of a row is: the top two loops of the HDC are not found directly above the rest of the stitch. Instead,
  • If you're crocheting in rows and turning to begin each new row, you're looking at the back of each hdc, and its two top loops are found just after the rest of the stitch.
  • If you're not turning to begin each new row (such as when working in rounds), you're looking at the front of each hdc, and its two top loops are found just before the rest of the stitch.
Photos 3 & 4 illustrate another tip that might help some crocheters. They are nearly identical to the first two photos. The third photo shows 3 HDC remaining. The fourth photo shows the last HDC after I've poked the crochet hook under the top two loops of it, so that you can see where I'm about to place my last HDC.

The only difference between the second pair of photos and the first pair is the direction I turned my work to begin a new row after chaining 2. I'm crocheting right-handed, and in the first pair of photos I turned my work counterclockwise [a.k.a. anticlockwise] each time I began a new row. In the third and fourth photos, I turned my work clockwise each time I began a new row. (Someone crocheting left-handed would do the opposite.)

Controlling the way the turning chain-2 looks to you as you near the end of the row might help prevent you from being tricked into accidentally increasing or decreasing. To me, in the third photo I'm less likely to think the chain-2 is an HDC. Whereas, in the first photo, I'm tempted to wonder if I should crochet into the top two loops of the chain-2.

Happy crocheting, I hope this helps someone!
Here are two more ways the HDC is the star of the design: Mamruana and Rosebud Argyle.

Thursday, December 16

Tunisian Crochet Basics: How to End a Forward Pass

I use this abbreviation in my Tunisian crochet patterns: endTss. It stands for "ending Tunisian simple stitch." If you are crocheting right-handed, this would be the stitch found along the left edge (and this is reversed if you're left handed).

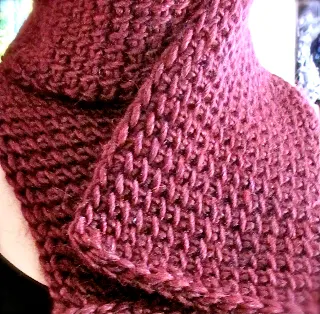
"Burly" Men's Scarf in Tunisian Simple Stitch
In pattern-writing language endTss is one of several ways to say, "Work the last stitch of each forward pass the usual standard recommended way."

This left edge stitch has a front vertical bar, like the other Tunisian stitches of each row. It also has a few other vertical strands associated with that same stitch. In fact, it has a total of three vertical strands. Why? Because the last Tss of the row is always a chain stitch, and a chain stitch has three strands in it. (Watch how the last stitch is created next time you crochet it and then begin the Return Pass.)

Some crocheters insert the hook under just the one front vertical bar, same as for the rest of the stitches of the row; however, "endTss" means do not do that. Instead, insert the hook under the front vertical bar and one other nearest vertical strand of the stitch. The outermost one is the easiest.

Doing this, instead of picking up only one strand, will give the edge a more finished chained look. This two-strand chained effect is preferable because:
  1. It matches the other 3 edges better (especially if you began your project by working into the bottom third loop of the foundation chains).
  2. It has a bit more heft, so it helps stabilize and even out the edge more than a lone strand would (it is "self-finishing").
  3. If you will be crocheting a border along the edge, it's a better and more pleasant edge to work stitches into.
I'm not aware of it preventing curling though :-)

See the two-strand chained edge of this Burly Scarf?