Saturday, August 30

Three Ways to Crochet Into Love Knots (a.k.a. Solomons Knot, Lover's Knot)

This is the second of a three-day series about crocheting Love Knots (a.k.a. Solomon's Knot, Lover's Knots, or Knot Stitch). This mini-series presumes that you already know how to make a slip knot, and how to crochet chain stitches and single crochets (UK: double crochet). 
Today is about how to crochet your next row into Love Knots. Topics of the other two posts are: 
- How to Crochet a Love Knot. Or see this freshly updated version.
- Crocheting Into Love Knots: Special Tweaks. 
Top to Bottom:
  Dragonfly Cord, Seagrape Anklet, Sambuca Necklace


Yesterday's post was about crocheting a single string of Love Knots. Depending on your project, it might be called "the foundation row" or "Row One" or, "Hey look, I just made a necklace/eyeglass cord/wrap bracelet/ tie belt!"

Free Love Knot pattern
Buffalo Knot Belt

Things get really interesting when we crochet Love Knots (and other stitches) into Love Knots. Not only do we have fun choices, Love Knots can mess with your mind. Seriously.

A single string of Love Knots is three-dimensional, like a sculpture of bubbles. Crocheters often lose their way when it's time to turn and begin a new row. The risk of accidents (changing the stitch count, adding a twist in the foundation row) can make even a seasoned crocheter twitchy about this stitch.


The first step is to know when your Love Knot is upside down! Let's dissect the loopiness.


Anatomy of a Love Knot


Doesn't the bottom of the single crochet
look weird when it's facing up?
A common mistake is crocheting into upside-down Love Knots when you don't mean to. The top loops of a Love Knot can look weird. The easiest way to identify them is to look for the top two long loops (tinted green), which are always paired. In contrast, the bottom long loop of the Love Knot (tinted yellow, above) is always a singleton.

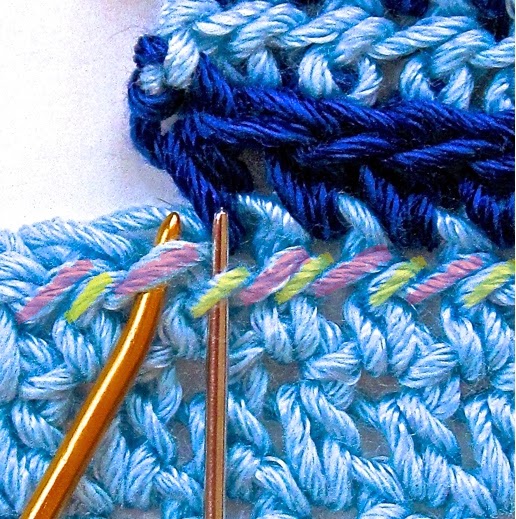
The top two loops of the single crochet (sc) have more of the familiar chain-link look, like the top two loops almost all crochet stitches have (tinted pink, above).


Unless a crochet pattern states otherwise, plan to crochet your next row into both top loops of either the sc (pink) or the long loops (green).


The Three Ways to Crochet Into Love Knots


Method 1.

The most common nowadays is to single crochet (sc) into the sc "knot" part. (I say "nowadays" because old thread crochet patterns often used the second method, below.)
Insert your hook under the pink loop AND
the other top loop behind it (not showing in this photo.)
An example of sc stitches
crocheted into the sc of Love Knots
(Sister Act Shawl).

This is the method I used for the "Sister Act Shawl and Shrug" published in Interweave Crochet magazine, Summer 2013 issue.

Fish Lips Lace.

Less common variations: You can crochet a different stitch into the Love Knot sc, for example double crochets (dc; UK: tr). That's what I did for the Fish Lips Shrug

When you crochet taller stitches into the Love Knot sc's, special things happens. The Love Knots have more room to expand. I find that Love Knots have a special affinity for dc stitches in terms of scale.


Method 2.

Single crochet before and after the sc "knot." This means one sc into two long top strands of one Love Knot just before the next sc "knot," and a second sc into two long top strands of the next Love Knot just after the sc "knot." 

This traditional method has several merits. It makes even the finest thread easy to crochet with, because the long loops are very easy to see and crochet into with a tiny, tiny crochet hook. It reinforces the places where the rows are linked to each other. The weight-bearing stress is distributed across more threads and stitches. This helps even the largest, most delicate lace pattern support its own weight, with less wear - while also holding open the lacy part of each Love Knot!
Method 2: Emphasis on the knots.

It does take a bit of foresight when planning the foundation row because you'll be adding more stitches in the next row (another sc each time you crochet into the Love Knots). Another factor to consider is that the extra sc can make the knot parts look lumpier in thicker yarns.

Variations: I hope you feel free to try this with other stitches besides a sc, such as the half double (hdc; UK: htr). Crocheters did 100 years ago!


Method 3. 

This is the rarest of the three: crochet into the long strands of only one Love Knot (not two, like in Method 2). In the inset photo below you can see a resulting stitch pattern. In the top two long loop of each Love Knot I crocheted a sc and a Love Knot.

This Marisa Artwalk (in progress) is a free form type of Love Knot pattern. Part of its unusual look is due to using Method 3.
Marisa Artwalk


Did you enjoy this post? I want to hear about it and so do your friends! Please check back for the third installment. 


Part 1 of 3: How to Crochet a Love Knot.

Part 3 of 3: Crocheting Into Love Knots: Special Tweaks.
UPDATE: I posted a fresh revision of Part 1, and from there you should see Crocheting the Love Knot Mesh.

Friday, August 29

How to Crochet a Love Knot, Part 1 of 3

Nov. 2017 UPDATE: I revised this post and created a permanent page for it my new website. After that one see its new companion, "Crocheting the Love Knot Mesh".

This is the first of a three-day series about crocheting Love Knots (a.k.a. Solomon's Knot, Lover's Knots, or Knot Stitch). This mini-series presumes that you already know how to make a slip knot, and how to crochet chain stitches and single crochets (UK: double crochet). 
Today is about how to crochet one stitch. One Love Knot at a time. Topics of the other two posts in this miniseries are: 
- Three Ways to Crochet Into Love Knots.
- Crocheting Into Love Knots: Special Tweaks.
 

The Foundation Love Knot

A beautiful, beautiful thing about Love Knots is that you don't need to start with foundation chains. Love Knots can easily serve as their own foundation row.

A foundation row of Love Knots of equal size. This is the front.

As students exclaim in Love Knot classes, "You mean I just make them in the air?" YES. Like magic (or like the chain stitch), you just crochet Love Knots out of thin air.


Step 1, The Loose Chain Stitch 

Use a smooth, light-colored yarn and a crochet hook size that goes with the yarn. Make a slip knot and place a loose loop on your hook. 'Loose' means about an inch long. Now yarn over and pull the yarn through to make a loose chain. 

If you know how to crochet a chain, this is nothing new. Feel free to crochet a few chains first, even tight ones if you like.
Notice loop "A." That's the important 
one for Love Knots.

Know Your ABCs!

Compare the three loops of your loose chain to the A, B, and C loops in the drawing at right. 

Love Knots have a reputation for being tricky. Feeling unsure about which loop of the chain stitch to use is a common hurdle. 
Now you're ready for Step 2.


Step 2, Tie the Knot in That Love with a Single Crochet

The single crochet stitch in progress. 
(Ignore the label "D" which is for 
beading purposes.)
Single crochet in loop A. Insert your hook between Loop A and the other two loops, yarn over (as shown in the next drawing), pull through the loop: 2 loops on your hook. Yarn over and pull through both loops on your hook to complete a normal single crochet.

That's it, you're done, you created a Love Knot out of thin air!


Step 3, One Love Knot, Now What?


Lovebud Vine Charms
gussied-up
Love Knots!
Sparkle Love Knot Lariat
You have one loop on your hook after completing the single crochet. You can now launch right into a second Love Knot, as shown in the photos at the top of the post. 


-:-------:-

Since we're crocheting, there are of course lots of fun Love Knot variations. For example, instead of a single crochet in loop A ("the bump loop") of the chain, try a different stitch, or group of stitches. Instead of loop A, try crocheting into a different loop or loops of the chain. Once you're clear on how to make a classic Love Knot, invent your own variations. Try a wide range of yarns, too - the same Love Knot can look very different in other yarns.

Next posts in this series: the 2017 "Crocheting the Love Knot Mesh"
Part 2 of 3: Three Ways to Crochet Into Love Knots.
Part 3 of 3: Crocheting Into Love Knots: Special Tweaks.

You might also like: 


This is what the backs of the Love Knots look like when I
turn to begin a new row. More on that in the next post.

Friday, June 6

How to Crochet Into that Third Loop or Lower Horizontal Bar of Single Crochets

The moral of the story is, if you think you're looking
at the tops of stitches, you probably are
. Orbit Cowl
The third loop is required for "camel crochet." It has also been called the humpbump, nublower loop, back-back loop, and lower horizontal bar of the single crochet (sc in the US; double crochet or dc in the UK and Australia). The patterns that result from using this loop in different ways have been called Savvy Single Crochet, and Camel Crochet™. 


Pallas Scarf uses a few kinds of third loop
stitches. Its prominent top loops give this
design a strong impact.
I've listed these alternate names first so that crocheters searching for help have a chance of finding this post! For some reason this loop - a simple part of a simple stitch - is ignored in the crochet how-to books. (Be sure to see the end of this post for a chronological list of books that mention this topic somehow, and some how-to videos!)

It's not that I think beginners need to launch right into using it, but if it were named in a diagram along with other stitchy bits, it would give newbies a stronger foundation for broadening their understanding later. We'd have a common language. Designers wouldn't think twice before using it.

Here's how to find the loop in sc and use it. (Scroll down for hdc.) I've used it in a few of my patterns and want to use it more without confusing people. 
Single crochet stitches. This is a close up of the next photo below. I tinted the third
horizontal loop of the single crochets. The copper needle point is inserted through the
loop from under it, just like you'd do with the crochet hook for a nice ribbed look.

1. Loosely crochet a row of some sc. You already know about the two top loops of a sc, right? They're the ones you crochet the next row of stitches into (unless directed otherwise). The top loop nearest to you is the front loop and the other is the back loop. These loops are labeled consistently in the books.

2. While you're crocheting each sc, you see the front of it. Look closely at how different the back is from the front of the stitch. The main difference is a small horizontal bump strand on the back only, just under the top loop.
The fronts of the dark blue rows are facing us, and their top loops are bent over toward us, because the light blue rows were crocheted into this third loops. We're looking at the tops of their heads.
I crocheted the dark blue rows into both top loops of the light blue sc.

Issue #61 of Crochet
Inspirations Newsletter
Not only can you crochet into that third lower bump loop, you shouldFor more on the uses and possibilities of this third loop, please see issue #61, "Top Loops Optional," of Vashti's Crochet Inspirations Newsletter.

3. Finish your first row, chain 1, turn. Now the backs of the first row stitches are facing you. Look again for the third horizontal loop of the stitches. Skip the first sc and insert your crochet hook in the third loop of the next sc, from under the loop (not down through the top), then yarn over and pull through the loop. You should have two loops on your hook. Yarn over again and pull through both loops to complete a sc. 
Ever wondered if third loops are used
for the Thirsty Twists Bathmat?
Yes, but not as many as you think.


Three Tips!

It's weird and slow to crochet into this loop at first, but like everything, it gets easier. (I've only used the stitch in small strategic areas of my designs for effect.)

1. Keep stitches loose; use a larger crochet hook.

2. Use a pointy-headed crochet hook. You can even file the head of some of them to customize it.

3. Try this: when you pull up a loop in that third loop and leave it on your hook, pull up on it a bit. I've seen some people make their sc with their hook at an angle - angled toward the beginning of the row (held more horizontally than vertically). This makes a slightly stretched, taller sc with a loosened third loop, making it easier to crochet into.

The key to the effect is that none of the top loops of the first row are covered by stitches in the next row, so they ride along the surface as a neat chained-looking ridge.


Now for the Half Double Crochet (Hdc)
I hear some of you saying, "I do this already with hdc to make a squishy hdc ribbing!" And crocheting into the third loop of hdc is more common (though not as common as you'd think, if the crochet stitch guides are any indication). It's also easier because the third loop of hdc is looser.
These are all hdc. I color-coded the two different kinds of "third loops."
The only one I've used in designs, and have seen others use, is tinted pink.
The lemon-tinted one is worth trying, though. It makes a rib that's less offset
and bent. It's structurally the same as the sc third loop.
Interestingly, that hdc third loop is anatomically different from the sc third loop. (See newsletter #61 about this.) 

I checked about 30 likely books for any explanation of this third loop of sc and/or hdc. Here's a chronological list of the what I turned up. 


If you know of a source that is not on this list, please name it in the comments.
Note: some book titles are Amazon Affiliate links. If you click on them, it helps me out a little. Thanks!

1975: Golden Hands Special #40; Aran Crochet chapter, "Crochet rib stitch: …*work 1sc into horizontal loop below top of the next sc*…" and "Aran rib" (a row of hdc in the back loop only alternates with a row of third loop hdc).

1981: Anne Rabun Ough, New Directions in Crochet; shallow sc on p. 60.

1983/1985: Pam Dawson, Complete Book of Crochet; p. 116 "Single Rib Pattern" with diagram, in "Aran Crochet" chapter. same instructions as in Golden Hands (1975).

1985/1986: Rhoda Ochser Goldberg, The New Crochet Dictionary; p. 114, "Aran Crochet" chapter: same introduction and instructions as in Golden Hands (1975). hmmm...

Third loop crochet tends to be dense and warm; rows of
all sc or hdc in the top loops are too. This speedier third-loop
fabric is a light, airy, stretchy exception. Half Circle Handbag.
1986 Denmark/1995 USA: Lis Paludan, Crochet: History and Technique; p. 233-235, "the loop behind the stitch" and "hook inserted into the little loop under the stitch," with a nice diagram. Two swatches: sc in third loop only with turning, and in the round with no turning. (Interweave Press; out of print)

1990+: Naka Pillman, Camel Crochet™ Basic Instruction Book (and others in the series).

2007: Bendy Carter, Single Crochet from A to Z Sampler Afghan™; pp. 6, 10, 13, 17. Three kinds of fabrics using this loop called "horizontal bar." (Annie's Attic/DRG.)

2007: Helen Jordan, Stitch Collection: Textured Crochet, see p.54-57; "Inserting your hook into different parts of the stitch, when working half double crochet makes quite a difference to the surface of your work."

2008: Karen Whooley, Savvy Single Crochet. (Annie's Attic/DRG.)

2010: Karen Manthey, Crocheting for Dummies; in "Creating Texture in Unexpected Ways," I love the symbols given for the top front loop, top back loop, lower front loop, and lower back loop! States a "back-most loop" can be crocheted into for half double crochets and taller stitches.

2011: Robyn Chachula, Crochet Stitches Visual Encyclopedia; Pattern for "Middle Bar Half Double Crochet." "The middle bar is below the top two loops." "Tip: You can crochet in the middle bar of any stitch taller than half double crochet."

Videos and Recommended Webpages:
------------------------

Karen Whooley's Savvy Single video. Link starts approx. 2 minutes in, when Karen has completed a row of the usual traditional single crochet stitch. She then goes on to show how to do the next row of single crochet in the third loop.
Kim Guzman's information page; includes videos.
Follow the tweets of Camel Crochet.


Camel Crochet video by Bob Wilson.

------------------------