Wednesday, March 25

Filet Crochet Gauge Tips: Tunisian Crochet Filet Too!

Crocheters often have trouble matching both stitch gauge and row gauge with filet crochetNot only do we vary in how tall we make our double crochets (dc; tr in the UK); we also tend to make chain stitches (ch sts) tighter than other stitches. There are lots of ch sts in filet!  

Minuet Vest by Vashti Braha: Regular filet crochet (left); Tunisian filet crochet (right).

The stitch gauge is how many stitches measure 4" or 10 cm in a row. The row gauge is how many rows stack up to 4" or 10 cm. 

Sometimes Tunisian filet crochet can bail you out. Below I list some of my current favorite Tunisian crochet alternatives, along with some common methods non-Tunisian filet crocheters use to achieve the stitch and row gauge they need. 

“Getting gauge” both horizontally and vertically (i.e., stitch and row gauges) is especially important when you want to create a picture with filet lace. Some of those antique filet charts are stunning. Getting gauge is also a big priority when you’re crocheting clothing in a particular size, like the unusual Minuet Vest design pictured here. Depending on the project, just getting the stitch gauge might be sufficient, and you could add or subtract a few rows if your row gauge is off. (I guess you could consider this gauge strategy #1; just don’t use it for pictorial filet!)

The Minuet Vest can be crocheted in regular filet crochet (1 treble crochet + 2 chain stitches) like the light yellow one shown, or you can create the same vest with Tunisian crochet stitches (like the cherry red one shown). It's more important to get both the stitch gauge and row gauge stated in the Minuet Vest pattern then whether you use the same exact stitches I used. 
Kind of unusual – and freeing – isn't it?


Tips for Fine-Tuning Your the Filet Crochet Gauge

Aquarienne
This is not about mixing some Tunisian sts with regular sts in the same row. This is about doing a whole filet project in either Tunisian sts, or regular filet sts. (Maybe you could mix the techniques within the same row or alternate rows to good effect; I haven’t tried it.)

Filet crochet is easy to learn, but I consider this topic to be intermediate level for Tunisian crochet. To see if you're ready for it, bop over to this post for a sec.

This is not a complete list, but I hope it's a helpful starting point. If you have a favorite method for adjusting your filet crochet gauge, please leave a comment.

I'm not sure how useful the Tunisian tips will be if you're mostly doing fine thread filet crochet. I haven't found (yet) that I can use Tunisian crochet with thread as fine as I can comfortably use with regular crochet sts. When I use a yarn finer than fingering wt (size #5 cotton thread or CYC #1) with lacy Tunisian crochet sts, I start to prefer fine-textured wools and blends over the traditional glossy crochet cotton threads for lace. 

Tip #1: If you’re using a text pattern (not just a chart), first check whether the pattern you're using is written with British/Australian crochet abbreviations, or with American ones. For example, a treble crochet (tr) outside of the USA is called a double treble. That's another yarn over!

Stitch Gauge in regular filet crochet 
The stitch gauge is actually determined by the top two loops of every stitch of a row (and their size is supposed to be determined by the hook size). Find out your best hook size for the project by getting your stitch gauge right; then tweak your row gauge below. If you don't have enough stitches for every 4” along a row, swatch again with a slightly smaller hook size. If you have too many, swatch with a slightly larger hook size.

Tip #2: It’s common for crocheters to decide to crochet the ch sts tighter or looser. Doing so consistently throughout a whole project requires creating a new stitching habit, which is easier for some than others. 

Tip #3: 
Ch 1 more to add a bit of width, or ch 1 fewer to subtract a bit of width between the tall sts. Filet crochet is unusual because often what matters is the size ratio between your chs and tall stitches rather than the specific tall stitch, or number of chs, you use! So, if your ch-2 spaces are too wide, try a swatch with just a ch-1 space. 

Tip #4: Here are some tips for tightening loose top loops of tall crochet stitches while crocheting them. It could have an impact on your overall filet stitch gauge.

Tip #5: One way to subtly alter the top loops of tall filet sts is to crochet the next row into them differently. Some crocheters crochet into both top loops plus a third horizontal loop just under the top loops of the tall stitch. Twisting a top loop as you crochet into it will tighten it. Inserting your hook into the loop from the opposite direction will twist it. This tweak is much less common in regular crochet than in Tunisian, though, because it changes the traditional texture. 

Left: Tunisian Knit Double Crochet (Tdc; in UK, Ttr) + 1 Tyo
Right: Regular Double Crochet (UK: tr) + Ch-1

Stitch Gauge in Tunisian filet crochet 

You can't merely ch 1 or 2 to make a space like you would in regular filet crochet. Instead, you could:

Tip #6: During the Forward Pass, use 1 or more Tunisian Yarn Overs (Tyo). During the Return Pass, crochet it off of the hook just like any other Tunisian stitch. Click here for how to do this simple, useful stitch. 
  • Compared to the ch sts in regular filet, each Tyo tends to be looser and adds more width to the row. For my Minuet Vest, this slightly looser effect was exactly what I needed. As you can see in the yellow regular filet version, the filet spaces are narrow. I preferred them a bit wider, closer to square, to make edging them easier. If your regular filet matches the gauge in the Minuet pattern, feel free to substitute. 
Ennis Revelation: Tunisian Filet Crochet
Tip #7: Add an extra stitch during the Return Pass: During the Forward Pass, just skip the stitch where you want a space. During the Return Pass, add a ch (i.e., "yarn over and pull through 1 loop instead of 2" once) when you get to that skipped stitch. 
  • Note that this is a nonstandard Return Pass, requiring you to remember to add a ch in specific places. Like chs in regular filet, the result tends to be tight. It is not my first choice for crocheting draping clothing, so I have not experimented with it much.
Tip #8: With tall Tunisian sts (more on them below), you can subtly tighten (narrow) the stitch gauge by twisting the vertical bar (vb) as you crochet into it. I’ve done this a lot because I love the effect. The twisted vb acts like a pivot, which adds drape. It also adds a lovely surface texture with fine silk yarns.

Row Gauge in filet crochet  

Getting row gauge frustrates some, but to me, subtly altering the height, drape, and silhouettes of tall sts is an art in itself. Here are some examples of how to make three different tall sts that fall somewhere between a dc and a tr in height:

Tip #9: Start off each tall st with longer or shorter “legs.” Begin a tr like usual: yarn over your hook twice, insert hook in designated stitch, yarn over and pull up a loop--but pull up this loop a bit less high than you normally do for shorter legs, or a bit higher than usual for longer legs. Crocheters all over the world vary in how high they pull up this first loop when they make the taller stitches such as tr.

Tip #10: Substitute the tall sts in the pattern with extended sts. The heights of extended sts fall in between the basic tall sts. For a st that is a bit shorter than a tr, try an extended dc (edc); an extended tr (etr) would be a bit taller than a tr. To make the edc: Yarn over the hook once, insert hook in designated stitch, yarn over and pull through stitch (3 loops on hook), yarn over, pull through one loop on hook, yarn over, pull through two loops on hook, yarn over and pull through remaining two loops on hook. 

Tip #11: Compare the subtleties of these three swatches: First swatch filet rows of tr sts with shorter legs, and one of dc with longer legs. Then make a third swatch of edc and compare the three in terms of stitch gauge, looks, feel, and which you enjoyed crocheting more.

What about Tunisian filet crochet? What if the Tunisian rows are not tall enough? We can make tall and taller Tunisian crochet stitches too, for example the Tunisian Double Crochet (Tdc; in UK, Ttr) or Treble Crochet (Ttr; in UK, Tdtr). 

Tip #12: Like regular crochet, there's no limit to how tall you can go with Tunisian sts; and like regular crochet, sometimes you need a st that's in between a Tdc and Ttr. I find that crocheting a tall stitch into a twisted front vertical bar adds a surprising amount of height to the stitch. I didn't need it for the Minuet Vest. On the other hand, Tunisian Knit stitches (between front and back vertical bars and under all horizontal bars of the Return Pass), such as a Tdc or Ttr Knitwise, limits the stitch height.

-:-----:-

I love that Tunisian crochet adds to the possible choices for filet lace. Sometimes I prefer the look and feel of the Tunisian option. All Tunisian crochet stitches face the front, which adds a polished look; see the two swatches above.


There are more options that I'm sure I've never even heard of yet. Filet crocheters have had over a century to develop all kinds of ingenious solutions!

Monday, November 17

Ultimate Foundation Crochet Stitch Class!

My review of an important crochet class taught online by Marty Miller


It turns out that the most popular post of this blog is "Which Foundation Stitch? And Why?" If you were reading that post just now, then you're probably here because you want to learn even more about foundation stitches. I can't imagine a better way than to take this class—no matter how much crochet experience you have.


Doesn't this look like fun?
Marty Miller created an online seven-lesson class on foundation crochet stitches. Craftsy produced it. If you've already taken a Craftsy class, you know that you can interact with the instructor and view it at your own pace multiple times. You can also leave bookmarks and notes to yourself along the way, and download class materials.


I learned a lot from Marty's class, even though I already use foundation stitches in my crochet. While taking this class I was also in the midst of comparing methods for extreme increasing in Tunisian crochet lace. (See the resulting newsletter issue #64.) 
Test of 3 different end increases for
Warm Aeroette Tunisian Filet Scarf.
See this DesigningVashti stitch how-to.

Increasing whole groups of lacy Tunisian stitches at the end of a forward pass can be a tricky, tricky thing. (I often do this for Tunisian filet designs.) To add an infinite number of stitches this way, what you really need to do is add foundation stitches. Specifically, lacy ones. It takes a bit of engineering and I just hadn't thought of it this way at first. 

Blocks of lacy Tunisian crochet
stitches added to both edges. (Part of a
stitch how-to for Warm Aeroette.
Marty's class is mostly about regular crochet, but it can be applied to other kinds of crochet too. One of the valuable things Marty does in her class is explain how to make a lacy foundation row that's based on a lacy stitch pattern.

Mastering Foundation Crochet Stitches is full of Marty's original material, distilled from her years of teaching classes on foundation stitches, *plus* her class on extended stitches too! In fact, Marty teaches how to crochet extended stitches in Lesson One. It's an ingenious move to use extended stitches as a way to introduce foundation stitches.

She has a patient, step by step teaching style, and speaks with a calming, knowledgeable voice. Her personality, teaching skills, crochet love, and special tips show. 

Marty's Craftsy class is a bargain. Turns out Tammy came to the same conclusion! Have a look at Tammy Hildebrand's review, swatch, and description of each lesson.

See Laurinda Reddig's review and her fun range of swatches.

Friday, October 31

Blocking Crochet: Five Methods

I recently updated this post and created a permanent page for it at my new website!

One of the methods below could be the perfect finishing touch for your next crochet project, depending on your yarn and project type. It also depends on your own preferences. Each crocheter has a favorite method.

Special considerations for a specific stitch, technique, or project follow.

Five Crochet Blocking Methods

This is how love knots crocheted in wire look at first.

 Listed from the least aggressive to most.
Same love knots, "dry blocked(method #1; 
I used the crochet hook to help open them up)

Dry Block

A.k.a. hand iron. Every crocheter has done this without even knowing that it has a name. Stretch, spread out, and flatten your crochet piece on something flat. 

One's knee always seems to be nearby! Using one's knee or upper leg is not too bad for a small item, especially if you're wearing jeans or other fabric that provides a bit of friction. (Don't use it for measuring a gauge swatch though!) 

If your surface is hard and flat, such as a table, you can also press it, i.e. "hand-iron" it. 

Personally I almost never use this method.

Damp Block

A.k.a. spray block, and block with mist. Spritz liberally with water, especially the edges, then spread out on a toweled surface to dry. It's ideal for a quick block as you crochet every 8 inches or so of rows. Especially if you use yarns that respond dramatically to it like I tend to do, such as those with at least 20% rayon/viscose/tencel content.

This method is my personal favorite. I blogged about it back in 2010. I also combine it with methods 3 or 4 below: damp block while crocheting, then a final wet block when the project is completed. I prefer damp blocking partly because it's the most portable, and partly because it's fast. For most of the year here in humid Florida, wet things take too long to dry! 

Use a bath towel on a flat surface; the towel will provide some friction that I find in most cases replaces the need for pins.


Wet Block

Fully immerse it in water. This is Doris' favorite methodYou can soak plant fibers like cotton, linen, hemp, rayon in warm or cool water a bit. 

For non-superwash wools, immerse briefly in cool water to avoid fulling (felting), then remove excess water gently before spreading out on a toweled surface to dry. ShamWow super absorbent microfiber cloths help to speed up the drying here in humid Florida. I use them instead of/on top of a bath towel on a table.

I like to add a little hair conditioner to the water if the yarn is wool or silk. 


Steam Block 

When it comes to crocheting clothing with drape, I'm looking at you, acrylic yarns. Blocking with steam is an aggressive method, so you must first carefully test, each time. 

It can really pay off! It gives some acrylic yarns the beautiful sheen and drape of silk

Using steam blocking is an art that can bring out extra softness and luster in some silk, camel, and llama fibers too. More on this below.


Pin It, or Stretch on Blocking Wires

This is the most aggressive blocking method and so there is an art to doing it the optimal way. (You don't want to block a stretched, stringy, stressed appearance into the yarn or stitches, or leave permanent dents in stitches from the pins.) It's combined with wet blocking.

Personally and non-professionally, I have only ever pinned crocheted snowflakes. I usually see this method used for afghan squares before seaming them together, and for knitted lace. 

Perhaps the most important thing of all is to use rust proof pins! I don't own blocking wires, but I sure admire the knitted lace wraps that have been blocked with them.


Special Blocking Considerations


Blocking is actually an art, and you might enjoy this newsletter issue about that. 

Picots 

Tug and pinch each picot to round it out and make it visible, adding more water to them than the rest of the stitches, if necessary. 

Love Knots

Most love knots are intended to be plump, like a semi-inflated balloon. If yours are, damp block them. Spritz lightly with mist and smooth gently in a way that doesn't flatten the love knots, nor weigh them down with too much water. You might feel like it's not worth blocking them at all, but I tested this in my love knot classes and people could tell the difference.
UNBLOCKED Tunisian filet-style leaning crochet swatches

Yarn Color Issues

If the yarns you used might give off some excess dye, avoid wet blocking. Use light spray blocking instead. Maybe combine light mist with heavy #1 and/or #5.

Special Laces  

WET BLOCKED to remove biasing. (method #3.)
Tunisian crochet lace and filet crochet respond great to wet blocking (also very careful steam blocking if you used acrylic yarn). 

Aim for squared filet eyelets. 

For Tunisian crochet lace specifically: tug on the return pass lines to straighten evenly. Tug vertically more gently. On extended Tunisian stitches to fully extend them, if you used them, you must tug on them vertically to open them up. 

Garments

Wet blocking is the method here for a stylish fit, silhouette, and an elegantly flowing, breezy movement. See Doris Chan's blog post. If you used acrylic yarn, steam blocking can bring out fashion drape and gleam as if you used silk! 

Be sure to block the accessories that need to drape stylishly, such as wraps, scarves, collars, and even necklaces. 

Tip!: Steaming some animal fibers will soften them enough to wear around the neck. This came in handy for a men's scarf I crocheted in a yarn that had camel hair content!

Home Decor

Especially doilies, snowflakes, and afghan squares; also flowers and other appliques: These are the projects I have the least amount of experience blocking by any method. The most notable thing about them is that they usually need to be as perfectly flat and square, or round, as possible. Wet blocking with pins or wires is common. Sometimes starch is added (especially for snowflakes). 

And finally...for all blocked items by all methods:

Let air dry completely, then admire your work and bask in the compliments! And remember: the best time to take photos of your work is right after it's blocked.

Sunday, August 31

Crocheting Into Love Knots: Special Tweaks

This is the third and last post of a three-day series about crocheting Love Knots (a.k.a. Solomon's Knot, Lover's Knots, or Knot Stitch). The earlier two posts are: 
- How to Crochet a Love Knot (See the freshly updated version of this post.)
- Three Ways to Crochet Into Love Knots.
This mini-series presumes that you already know how to make a slip knot, and how to crochet chain stitches and single crochets (UK: double crochet). To learn how to crochet a Love Knot, see the first post in this series (above). The abbreviation "sc" means single crochet stitch in the US; in the UK it's "dc."
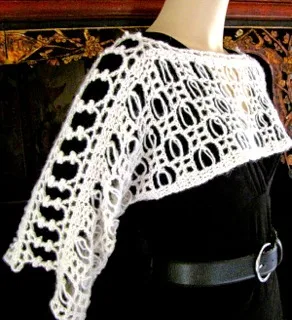
Electra Wrap

-:-------:-

Today's post is about two small stitch modifications ("tweaks") that bring out the best in one's Love Knots. I use these the most to keep a Love Knot from loosening up over time. Several things can cause the stitch to do this: the yarn type, a loose gauge, and the weight of the rest of the stitches pulling on each other. Also, the weight of beads, if you use them.

Tweaks abound in crochet and that's something I love about it! Tweaks are what get shared at crochet conferences and you're lucky to be there when they surface. To me, our real crochet culture is in these unofficial, off-road modifications crocheters are actually doing.

If you have your own favorite Love Knot tweak, please share it in the comments.


I. Lock It Down With a Tight Chain Stitch

Zuma Skirt by Doris Chan
Photo © 2013 Interweave Press.
Here's how: You've made a long loose chain, then knotted it with a sc to complete your Love Knot (see Part 1 for a refresher). Now chain 1 tightly. You can even yank it tight. You've added a padlock to that knotted love, baby.

It's easy, fast, and it seems to melt away from view. I've not found it to change drape or stretch. I do not crochet into it in the next row. I just ignore it.


Sweetberry Clasped Love
This was Doris' strategy of choice when she designed the Zuma skirt (shown at left). Skirts need to be able to hold up to real wear, and Doris didn't want the Love Knots loosening and looking sloppy over time.

It was a crucial tweak for me when I used metallic embroidery floss and beads for Sweetberry (shown at right). That floss was so slippery and wiry that it would start uncrocheting itself as soon as I finished each stitch! Not only that, the weight of the beads encouraged this misbehavior and just looked like a mess. A yanked-tight chain stitch fixed this.


II. Compress the Sc Knot

This tweak is so important to me that it's what caused me to do this three-part series. It's difficult to describe in patterns, so I created a photo tutorial for it, and then I wanted to share it!

Basically, when you crochet into the sc of a Love Knot, crochet into three loops of the sc, not just two. But which three?
The yellow-tinted loop is the 3rd loop that I use to compress the knot.
You can see with the gold needle on the left that it has all three loops on it.
If I don't do this, that's the loop that tends to loosen and drop down.

So while you're crocheting the next row, the backs of the sc you crochet into will be facing you. Insert your hook into the top two loops as usual, and tilt the top of the stitch toward you and down a bit to see that third loop at the bottom of the sc (as shown in the photo).

Compare these two images, one with the tweak, the other without it:
With the tweak (3 sc loops crocheted into, not just 2).
Note that the backs of Love Knots are facing.
Standard way, NO tweak: I crocheted into only the top two
loops of the sc. See how the Love Knot loosens? Look at how
the whole row looks uneven and sloppy. The loop that has
dropped down the most is the 3rd one I use in my tweak.  
Note that I tugged on all stitches to simulate wear, and used a looser gauge to help make all loops more visible.

That helpful third loop is actually one of the side loops of a sc, sometimes called one of its "legs" or part of its "post" or "stem." It's the same side strand that is used when making a popular type of picot
Beach day for the Electra Wrap.
Photo © 2013 Interweave Press.

When it comes to Love Knots, however, familiar loops look unfamiliar, and shift around. The side loop of the sc looks like a bottom loop instead when it's part of a Love Knot. This is one of those things about Love Knots that confuses folks! 

Now you know my special tweak for preserving the Electra Wrap's starry charm. 

Expanded PDF version of the Electra pattern is almost ready for purchase in my pattern shop! Subscribe to my newsletter to find out when.

Other posts in this series:
Part 1 of 3: How to Crochet a Love Knot.
Part 2 of 3: Three Ways to Crochet Into Love Knots (a.k.a. Solomons Knot, Lover's Knot)

Saturday, August 30

Three Ways to Crochet Into Love Knots (a.k.a. Solomons Knot, Lover's Knot)

This is the second of a three-day series about crocheting Love Knots (a.k.a. Solomon's Knot, Lover's Knots, or Knot Stitch). This mini-series presumes that you already know how to make a slip knot, and how to crochet chain stitches and single crochets (UK: double crochet). 
Today is about how to crochet your next row into Love Knots. Topics of the other two posts are: 
- How to Crochet a Love Knot. Or see this freshly updated version.
- Crocheting Into Love Knots: Special Tweaks. 
Top to Bottom:
  Dragonfly Cord, Seagrape Anklet, Sambuca Necklace


Yesterday's post was about crocheting a single string of Love Knots. Depending on your project, it might be called "the foundation row" or "Row One" or, "Hey look, I just made a necklace/eyeglass cord/wrap bracelet/ tie belt!"

Free Love Knot pattern
Buffalo Knot Belt

Things get really interesting when we crochet Love Knots (and other stitches) into Love Knots. Not only do we have fun choices, Love Knots can mess with your mind. Seriously.

A single string of Love Knots is three-dimensional, like a sculpture of bubbles. Crocheters often lose their way when it's time to turn and begin a new row. The risk of accidents (changing the stitch count, adding a twist in the foundation row) can make even a seasoned crocheter twitchy about this stitch.


The first step is to know when your Love Knot is upside down! Let's dissect the loopiness.


Anatomy of a Love Knot


Doesn't the bottom of the single crochet
look weird when it's facing up?
A common mistake is crocheting into upside-down Love Knots when you don't mean to. The top loops of a Love Knot can look weird. The easiest way to identify them is to look for the top two long loops (tinted green), which are always paired. In contrast, the bottom long loop of the Love Knot (tinted yellow, above) is always a singleton.

The top two loops of the single crochet (sc) have more of the familiar chain-link look, like the top two loops almost all crochet stitches have (tinted pink, above).


Unless a crochet pattern states otherwise, plan to crochet your next row into both top loops of either the sc (pink) or the long loops (green).


The Three Ways to Crochet Into Love Knots


Method 1.

The most common nowadays is to single crochet (sc) into the sc "knot" part. (I say "nowadays" because old thread crochet patterns often used the second method, below.)
Insert your hook under the pink loop AND
the other top loop behind it (not showing in this photo.)
An example of sc stitches
crocheted into the sc of Love Knots
(Sister Act Shawl).

This is the method I used for the "Sister Act Shawl and Shrug" published in Interweave Crochet magazine, Summer 2013 issue.

Fish Lips Lace.

Less common variations: You can crochet a different stitch into the Love Knot sc, for example double crochets (dc; UK: tr). That's what I did for the Fish Lips Shrug

When you crochet taller stitches into the Love Knot sc's, special things happens. The Love Knots have more room to expand. I find that Love Knots have a special affinity for dc stitches in terms of scale.


Method 2.

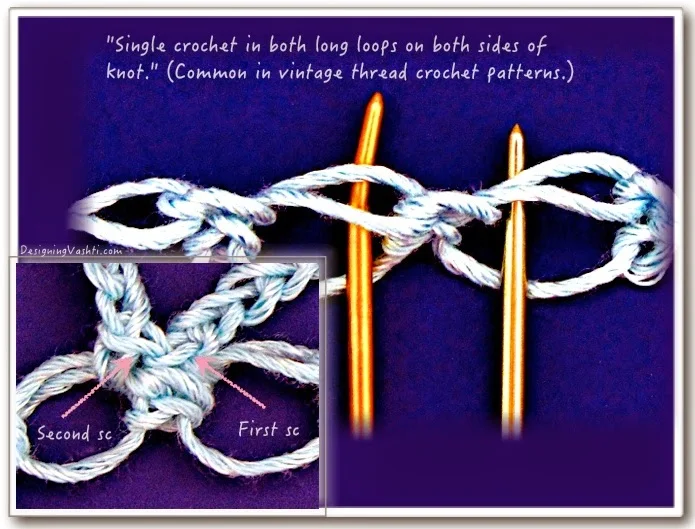
Single crochet before and after the sc "knot." This means one sc into two long top strands of one Love Knot just before the next sc "knot," and a second sc into two long top strands of the next Love Knot just after the sc "knot." 

This traditional method has several merits. It makes even the finest thread easy to crochet with, because the long loops are very easy to see and crochet into with a tiny, tiny crochet hook. It reinforces the places where the rows are linked to each other. The weight-bearing stress is distributed across more threads and stitches. This helps even the largest, most delicate lace pattern support its own weight, with less wear - while also holding open the lacy part of each Love Knot!
Method 2: Emphasis on the knots.

It does take a bit of foresight when planning the foundation row because you'll be adding more stitches in the next row (another sc each time you crochet into the Love Knots). Another factor to consider is that the extra sc can make the knot parts look lumpier in thicker yarns.

Variations: I hope you feel free to try this with other stitches besides a sc, such as the half double (hdc; UK: htr). Crocheters did 100 years ago!


Method 3. 

This is the rarest of the three: crochet into the long strands of only one Love Knot (not two, like in Method 2). In the inset photo below you can see a resulting stitch pattern. In the top two long loop of each Love Knot I crocheted a sc and a Love Knot.

This Marisa Artwalk (in progress) is a free form type of Love Knot pattern. Part of its unusual look is due to using Method 3.
Marisa Artwalk


Did you enjoy this post? I want to hear about it and so do your friends! Please check back for the third installment. 


Part 1 of 3: How to Crochet a Love Knot.

Part 3 of 3: Crocheting Into Love Knots: Special Tweaks.
UPDATE: I posted a fresh revision of Part 1, and from there you should see Crocheting the Love Knot Mesh.